Welcome, pilot. This is the complete guide to the H.U.D Manager overlay — the floating pill bar, your settings, and every app in the launcher. Each section covers what a tool does, how to use it step by step, its key features, and tips. New here? Start with Getting Started.
Getting Started
Getting Started
Install the app, accept the UAC prompt, sign in, and you're in the cockpit. The overlay is free to use — Premium is optional.
What it is
H.U.D Manager is a desktop companion app for Star Citizen that floats interactive panels over your game window. Download from hud-manager.com, run the installer, and it creates a transparent overlay window that stays on top of the game.
How to use it
- Download and run the installer. Windows may show "Unrecognized app" (SmartScreen warning) — click More info, then Run anyway. This is normal for new independent software and doesn't mean the app is unsafe.
- Approve the UAC prompt. When Windows asks "Do you want to allow this app to make changes?" click Yes. The installer needs admin permission to write to Program Files.
- The app launches automatically. On first run, you'll see the splash screen (Mission Control), then a quick sign-in. No credit card required.
- Sign in — the Basic overlay is free, forever. Once signed in you can use the free tier right away: the pill, core apps, and your loadouts. New pilots also get 14 days of Premium free (no payment info needed) to try everything. After that you stay on Free, or upgrade to Premium any time: $1.99 your first month, then $2.99/month (or $24.99/year). Cancel anytime in Settings or PayPal. Pilots who joined before the freemium launch keep Premium free for life as Founding Members.
- Complete the walkthrough (optional). On first launch, a 4-step onboarding tour shows you how to move the pill, open apps, and use hotkeys. You can replay this anytime in TOOLS → HOW TO USE.
- You're in. The overlay pill appears on your screen right away. Free covers the essentials; Premium unlocks every app, unlimited windows, and the full creator suite. See the full breakdown on the pricing page.
Key controls / features
- Tray icon — Right-click the icon in your system tray (bottom-right) to quit the app, enable Compatibility Mode (if the overlay is invisible), or open settings.
- Right Alt key — The default overlay toggle. Press it in-game to wake the overlay and grab mouse control; press again to drop focus back to the game. This key is rebindable in Settings → KEYS.
- Free vs. Premium — The Basic overlay is free forever (no card). New pilots get a 14-day Premium trial, account-tied; when it ends you simply drop to Free — nothing is charged unless you choose to subscribe. Cancel a subscription anytime; after the first charge there's a 14-day money-back guarantee.
Tips
- If the overlay window runs but nothing appears on screen, try Compatibility Mode: right-click the tray icon and enable it. This works around GPU compositing issues on some laptops.
- Set your player handle in Settings → SYSTEM → DIAGNOSTICS so the kill tracker and pilot status recognize you in-game.
- Your session persists for 60 days once you sign in — you won't be asked to log in every launch.
The Pill Bar
The thin floating bar at the top of your screen is your command center—move it, toggle it with Right Alt, and click buttons to open apps.
What it is
The pill is a horizontal bar containing buttons, status indicators, and app launchers. It's always-on-top and click-through by default (clicks pass through to the game beneath it). When you tap your hotkey (Right Alt), it wakes up, captures your mouse, and stays bright until you're done or it auto-dismisses after ~3 seconds of idle.
How to use it
- Move the pill: Drag the left handle (⋮⋮) to reposition it anywhere on your screen. The new position is saved automatically.
- Wake the overlay: Press your hotkey (default Right Alt) to make the pill bright and interactive. Click any button while awake.
- Return focus to the game: Press your hotkey again, or move your mouse away from the pill for ~3 seconds and it auto-dismisses. Click-through is restored immediately.
- Open an app: Click the app launcher button (⊞) to see all available pages. Click any app to open it in a side panel.
- Close the panel: Click the collapse arrow (^) in the pill, or press your hotkey while the panel is open.
Key controls / features
- Logo (H) — Brand mark. Click to view the About screen in Settings.
- Ship status chip — Shows your current ship name and callsign (e.g., "@Pilot" or ship model). Click to open the Pilot Hub.
- App launcher (⊞) — Opens a grid of all available pages (TRADE, MINING, PILOT, COMBAT, etc.). Click any to load it in the side panel.
- PILOT button — Shortcut to the Pilot Hub (account, builds, inbox).
- Screenshot (📷) — Capture your screen instantly. Saved to your Pictures folder.
- Record (●) — Start/stop in-game video recording with audio. Saved locally.
- Layouts (▣) — Save and restore window layouts (multiple windows, their sizes and positions).
- ⋮ TOOLS dropdown — Contains:
- ⚔ ACS (After Combat Stats) — Recent kills and combat summary
- ✉ INBOX — Pilot messages and alerts
- 🛒 CART — Ship loadout shopping list (parts you've added)
- ◆ AI ASSIST — Natural-language help for loadouts, missions, trade routes
- ▶ STUDIO — Creator Studio (screen recording, streaming tools)
- ◎ ACTIVITY — Quick-select mission mode (Combat, Trade, Mining, Exploration, Recording)
- ⌨ KEYS — Rebind your hotkeys
- 🕹 STICK — HOTAS / joystick setup
- ✦ MODE — Mission Mode selector (pre-configured window layouts)
- ▣ LAYOUT — Save and manage window layouts
- ☀ DISPLAY — Brightness, background opacity, text color swatches
- ◐ AUTO-FADE — Toggle idle fade (pill dims when you step away)
- ◯ CLEAR BG — Toggle full background transparency (content-only mode)
- ◷ SYSTEM STATS — Show/hide the corner GPU/CPU/RAM widget
- ❔ HOW TO USE — Replay the first-run walkthrough
- LINKS (≡) — Quick links to external sites (UEX Corp, SC Wiki, Erkul, etc.).
- Settings (⚙) — Open the full Settings panel (hotkeys, notifications, appearance, startup options).
- Quit (✕) — Close the overlay app entirely.
Tips
- The pill is click-through by default. Clicks beneath it go straight to the game. Press your hotkey to wake it and capture the mouse.
- Idle auto-dismiss: Once awake, the pill automatically returns to dormant state after ~3 seconds of mouse inactivity. You don't have to manually close it every time.
- Auto-fade: When dormant, the pill fades to nearly invisible (opacity ~0.1) so it doesn't clutter your HUD. It brightens again when you tap the hotkey or move your mouse over it (in hover mode).
- Focus vs. Hover mode: By default, you tap the hotkey to use the overlay (Focus). In Settings → KEYS, you can switch to Hover mode, where the overlay wakes whenever your mouse touches it—useful in free-flight, risky in combat.
- The pill auto-sizes itself to fit the widest button or dropdown, capped at ~90% of your screen width. You don't manually resize it.
UI Size Control (A−/A+)
The A− and A+ buttons in the bottom-left corner scale the entire interface up or down. Set it once and every page remembers your choice.
What it is
The overlay uses a shared zoom setting that applies to all pages (PILOT, BUILDER, TRADE, MINING, etc.) uniformly. You calibrate it once to your monitor and resolution, and the UI stays consistently sized forever—even when you switch between pages or relaunch the app.
How to use it
- Find the A−/A+ control. It's in the bottom-left corner of every overlay page, semi-transparent until you hover over it.
- Click A+ to make text bigger or A− to make it smaller. Each click adjusts by 10%.
- Adjust until it's comfortable. The center display shows the current zoom level (e.g., "90%", "100%", "120%").
- It's saved automatically. The next time you open any page, your chosen size is applied instantly.
Key controls / features
- A− button — Decrease zoom by 10% (minimum 70%).
- Percentage display — Shows current zoom as a percentage. Click it to reset to 100% (default).
- A+ button — Increase zoom by 10% (maximum 240%).
- Keyboard shortcut (Ctrl + scroll wheel) — Hold Ctrl and scroll your mouse wheel to adjust zoom live.
- Cross-page sync — Change zoom on PILOT, switch to BUILDER, and the new size is already applied there.
Tips
- The default zoom is 90% to fit more information on smaller screens. Increase it if you sit far from your monitor.
- Ultra-wide displays (32:9) often benefit from 80−90%. Single 1080p monitors typically work best at 100−110%.
- The control fades away at ~50% opacity when you're not hovering—it won't clutter your view while you play.
Settings
Configure hotkeys, notifications, appearance, and system options. Click the ⚙ gear icon in the pill to open Settings.
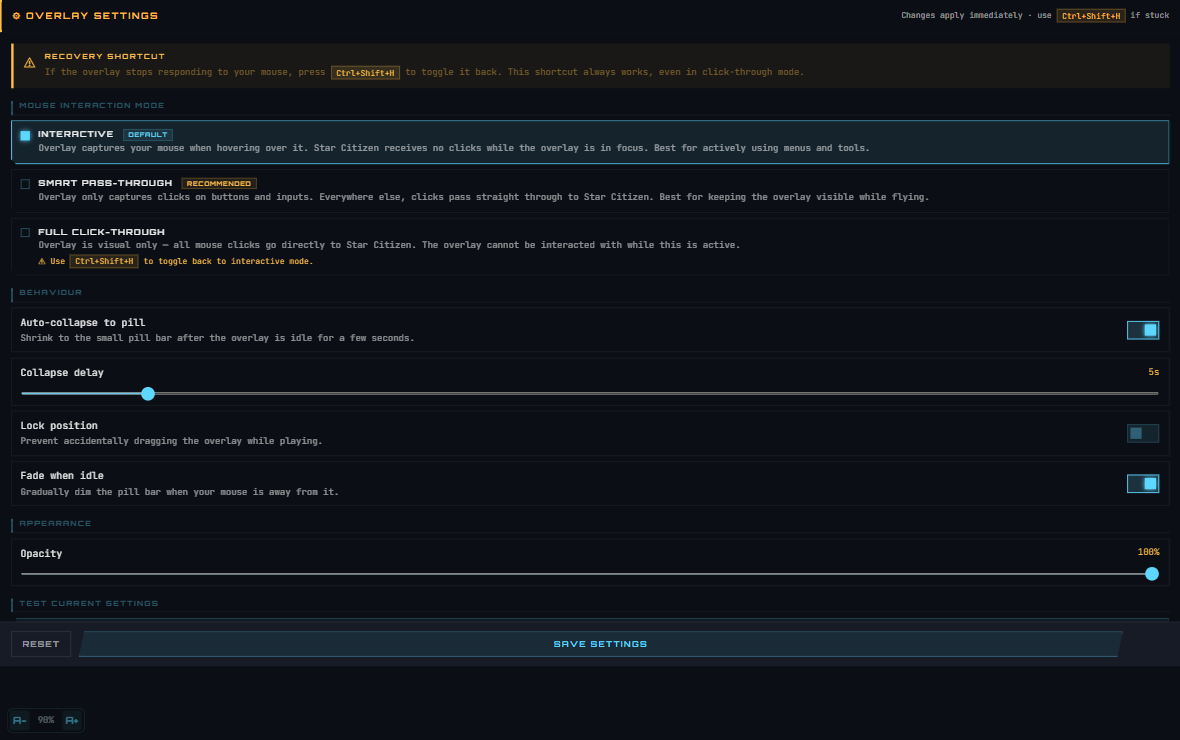
What it is
Settings is a tabbed control panel where you configure every aspect of the overlay. Changes are saved automatically to disk and persist across app restarts.
How to use it
- Open Settings: Click the ⚙ gear button in the pill bar.
- Click a tab at the top of the panel to jump to that section (KEYS, NOTIFICATIONS, APPS, SYSTEM, HELP, NEW, or ABOUT).
- Adjust any option. Changes apply immediately in most cases.
- Exit Settings: Click the collapse arrow or press your hotkey to close the panel and return to the bare pill.
Key controls / features
- KEYS tab
- Interaction mode — Choose Focus key (tap hotkey to use overlay; tap again to release) or Auto/Hover (mouse proximity wakes the overlay). Default is Focus.
- Overlay hotkey — Currently assigned key (default: Right Alt). Click SET KEY and press any key to rebind it.
- NOTIFICATIONS tab
- Enable/disable alerts — Checkbox list of notification types (kills, zone changes, targets, etc.).
- Notification style — Choose BARE (text only) or BOX (bordered cards).
- Voice readout — Toggle text-to-speech for alerts (ON/OFF). When enabled, the overlay speaks critical events like kills and zone entries.
- Reposition button — Lets you drag notification toasts to a new screen location while they're visible.
- ALL / NONE buttons — Enable or disable all notification types at once.
- APPS tab
- Launcher visibility — Checkbox list of apps. Uncheck an app to hide it from the app launcher (⊞) grid.
- Reorder apps — Drag items up/down to customize launcher order.
- ALL / NONE buttons — Show or hide all apps at once.
- SYSTEM tab
- Appearance
- Shell theme — Choose from Clean Embedded, Minimal Glow, Tactical, or Glass/Transparent.
- Brightness — Dim, Medium, or Bright overall color palette.
- Warm tone — Checkbox to add a warm (amber) tint to the default cyan/neutral palette.
- Interaction — Same as KEYS tab; repeated here for convenience.
- Startup options
- Start with Windows — Auto-launch the app on system boot.
- Start with Star Citizen — Auto-launch when you start the game (requires Windows taskbar integration).
- Overlay window settings
- Opacity slider — Global overlay window alpha (10%–100%). At 100%, panels are fully opaque. Lower values make everything semi-transparent.
- Size slider — Pill width scaling (60%–140% of default 700px). Useful for ultra-wide monitors or when you want a taller / narrower bar.
- Content creation
- Screenshot / Record buttons — Quick-access to capture and recording (also in the pill).
- Microphone selection — Choose which input device is recorded with your video (default: auto-detect).
- Save location — Where screenshots and recordings are stored. Click the … button to browse and change the folder.
- Multiple overlays
- Open new overlay button — Spawn a second, third, or fourth independent overlay window. Each can be configured separately and docked to different edges of your screen.
- Diagnostics
- Game.log status — Shows whether the app found and is reading your Star Citizen Game.log file (used for live kill tracking, zone detection, etc.).
- Game.log path — The full path to the log file being monitored. Usually
C:\Program Files\Roberts Space Industries\StarCitizen\LIVE\Game.log. - Reset button (⌖) — Resets the pill to its default screen position.
- Update button (↺) — Manually check for app updates.
- Appearance
- HELP tab — Beginner guide with step-by-step instructions, button descriptions, hotkey reference, and tips.
- NEW tab — Release notes for recent versions.
- ABOUT tab — App branding, version number, feature list, and legal disclaimer.
Tips
- Player handle: Set this in Diagnostics so the kill tracker correctly attributes in-game kills to you. It's your RSI or in-game name.
- Game.log must exist for live features (kill tracker, zone detection) to work. If the status shows "Not found," make sure you've launched Star Citizen at least once on this account.
- Voice readout is handy in mining or exploration but can be jarring in combat. Toggle it off before a PvP session if you prefer silence.
- Multiple overlays are useful for wide setups: one overlay on the left for TRADE, one on the right for MINING, centered PILOT HUB for your loadout. Each window remembers its own size and panel layout.
Core Tools
✦ PILOT HUB
Sign in, send custom loadouts to other pilots, and manage shared fleet builds via secure 8-character sync codes.
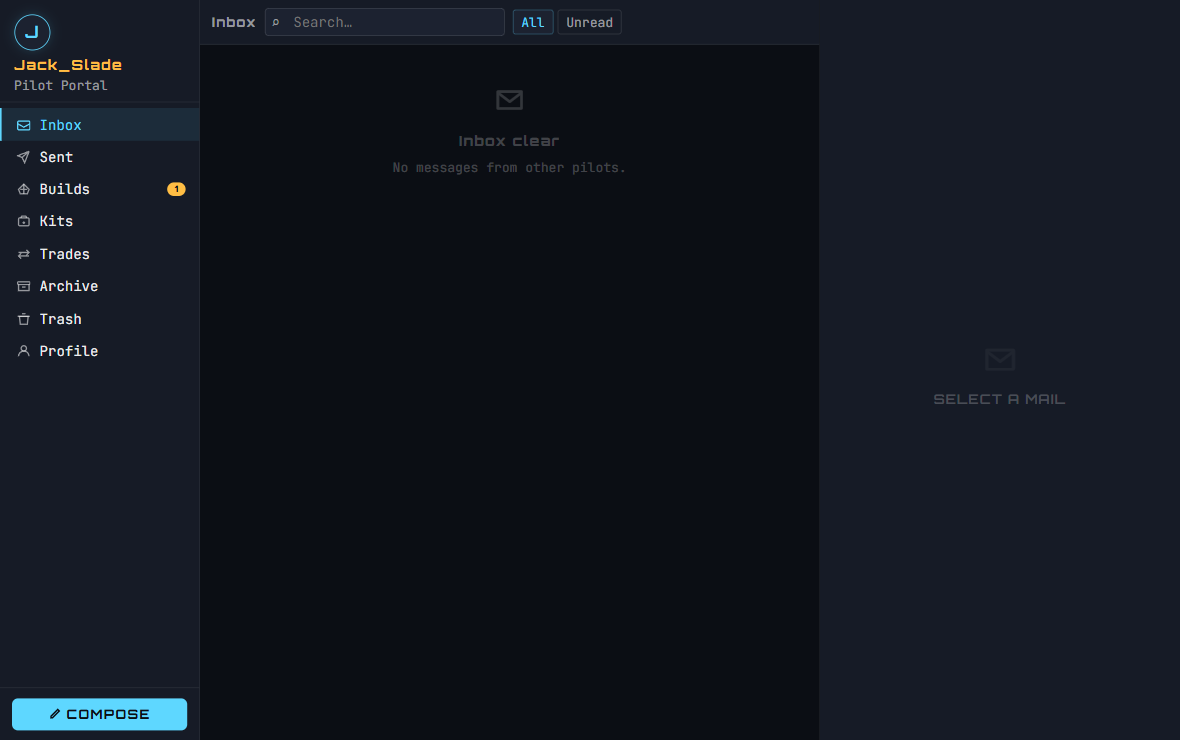
What it does
The Pilot Hub is a pilot-to-pilot communication platform. When you sign in with your SSO account (Google, Microsoft, Discord, or GitHub), you get a 3-pane interface: a folder rail on the left (INBOX, SENT, DRAFTS), a message list in the center, and a reading pane on the right that displays the loadout or trade plan you've been sent. You can compose messages to other pilots, attaching your current loadout so they can load it directly into their own Loadout Bay. Each sync is encrypted by an 8-character code that both of you share — no accounts are linked, just the data payload.
How to use it
- Click SIGN IN to authenticate with your preferred provider (Google, Microsoft, Discord, or GitHub).
- You'll land in your INBOX. Click any message to view the attached loadout or trade plan in the reading pane.
- Click Compose (top-right envelope icon) to write a new message, paste a loadout snapshot, and send it to another pilot.
- Sent items appear in your SENT folder; drafts save automatically as you type.
Key features
- SSO Sign-in — No passwords. One-click login via Google, Microsoft, Discord, or GitHub.
- Loadout Exchange — Share your current ship configuration with other pilots. They click a link and your loadout loads into their Loadout Bay automatically.
- Trade Plans — Send multi-leg trade routes. Recipients see your exact commodity chain with buy/sell prices and margins.
- Sync Codes — Each loadout or trade plan gets a unique 8-character code that encrypts the exchange. Share just the code if you want—no account linking required.
- Folder Organization — INBOX for received items, SENT for what you've shared, DRAFTS for work-in-progress messages.
Tips
- Use the CLASSIC tab to switch to the legacy Pilot view if you prefer a smaller embedded window.
- Sync codes are temporary—they expire after 90 days of inactivity to keep your data clean.
- A trade plan shows you exactly what profit margin each leg gives you. Share routes with friends to collaborate on mining or bounty runs.
⚙ LOADOUT BAY
Configure your ship's weapons, missiles, and components in real-time, with instant stat comparison and shopping cart integration.
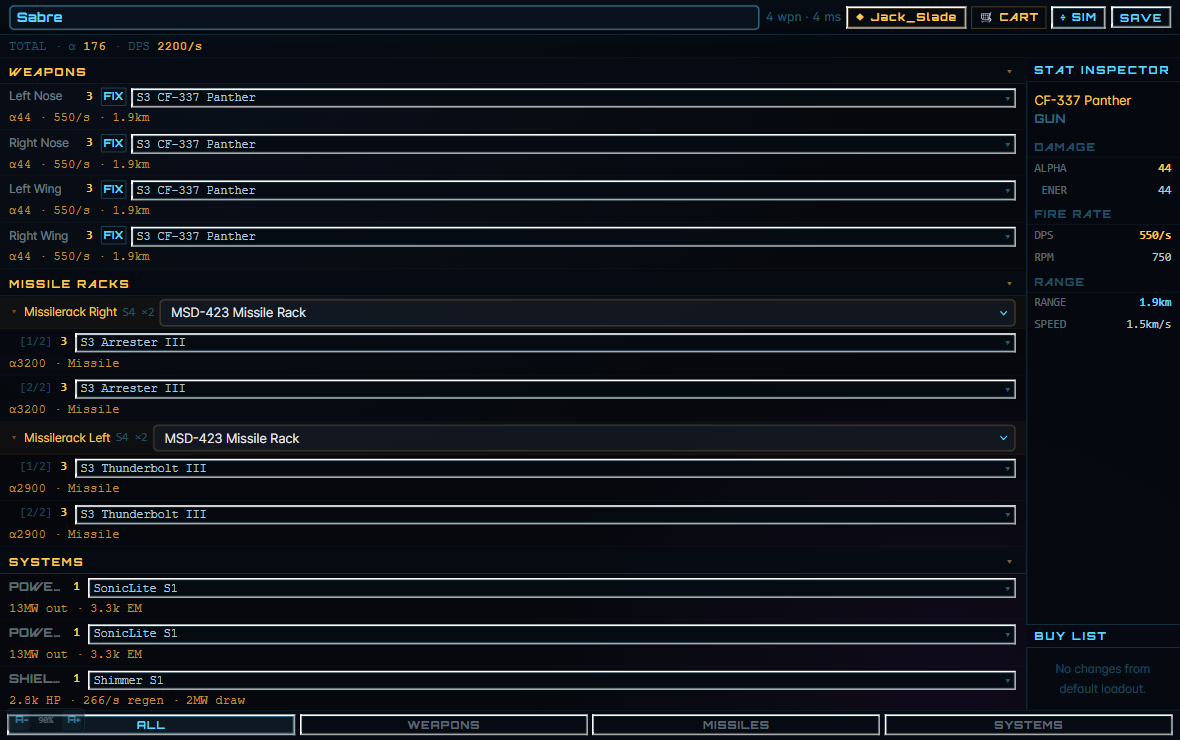
What it does
The Loadout Bay is your interactive ship configurator. Pick a ship from the dropdown at the top, and the page shows all its weapon slots, missile racks, and component slots (power plant, shield, cooler, quantum drive, radar). As you click each slot, a dropdown lets you choose which item to install. The right panel shows a stat inspector (DPS, alpha, range stats for weapons; HP and regen for shields; range and spool time for quantum drives) and a buy list that aggregates all the items you've selected. Components marked Stock show the ship's default loadout; components marked Changed are your customizations. You can save your build locally or export it as a shareable link.
How to use it
- Type a ship name in the search box at the top and click to select it. Your ship's current (default) loadout appears.
- Click any weapon, missile, or component row to open a dropdown with compatible options. Highlighted inline stats show how the new item compares to your current choice (↑ better, ↓ weaker, ≈ similar).
- The STAT INSPECTOR panel on the right shows detailed stats for the selected component (hover for tooltips).
- The BUY LIST below the inspector lists all components you've added (different from stock). Click a location to see where you can buy each item.
- Click 🛒 CART to add all selected items to your shopping list. Click SAVE to store your build locally with a name.
- Use the ALL · WEAPONS · MISSILES · SYSTEMS tabs at the bottom to filter what you see in the slot list.
Key features
- Live Stat Comparison — When you hover over a weapon option, inline text shows how its DPS, alpha, and range differ from your current gun. Green (↑) for upgrades, red (↓) for downgrades.
- Grouped Weapons — Identical weapons (e.g., 4× Ballistic Gatling S2) are collapsed into one row with a count. Avoids clutter.
- Buy List — See all items different from stock, where to acquire them (shop vs. mission vs. rare event), and total cost at a glance.
- Shopping Cart — Add items to a persistent cart that syncs across pages. Export it as text or JSON for planning.
- Local Saves — Save your loadout locally by name (stored in browser localStorage). Revisit and edit anytime.
- Shareable Links — Export your build as a URL snapshot (base64-encoded); send it to other pilots to load your exact config.
Tips
- Start with a ship's stock loadout, then tweak one or two slots. The comparison stats make it easy to spot if a weapon is strictly worse.
- Missile racks are labeled MSD- followed by (size slot / missile count / missile size accepted). A MSD-214 is a size-2 slot holding 1 missile of size 4.
- Right-side column labels: SIZE is the equipment size (S1 = smallest), STAT shows power output or other key metric. Amber highlight = your custom item; gray = stock.
- The sidebar is sticky — scroll the main weapon list while the inspector and buy panel stay put.
⌖ COMBAT LAB
Simulate a 1v1 fight between two ships. Watch how your weapons punch through shields, armor, and hull, and predict time-to-kill before you engage.
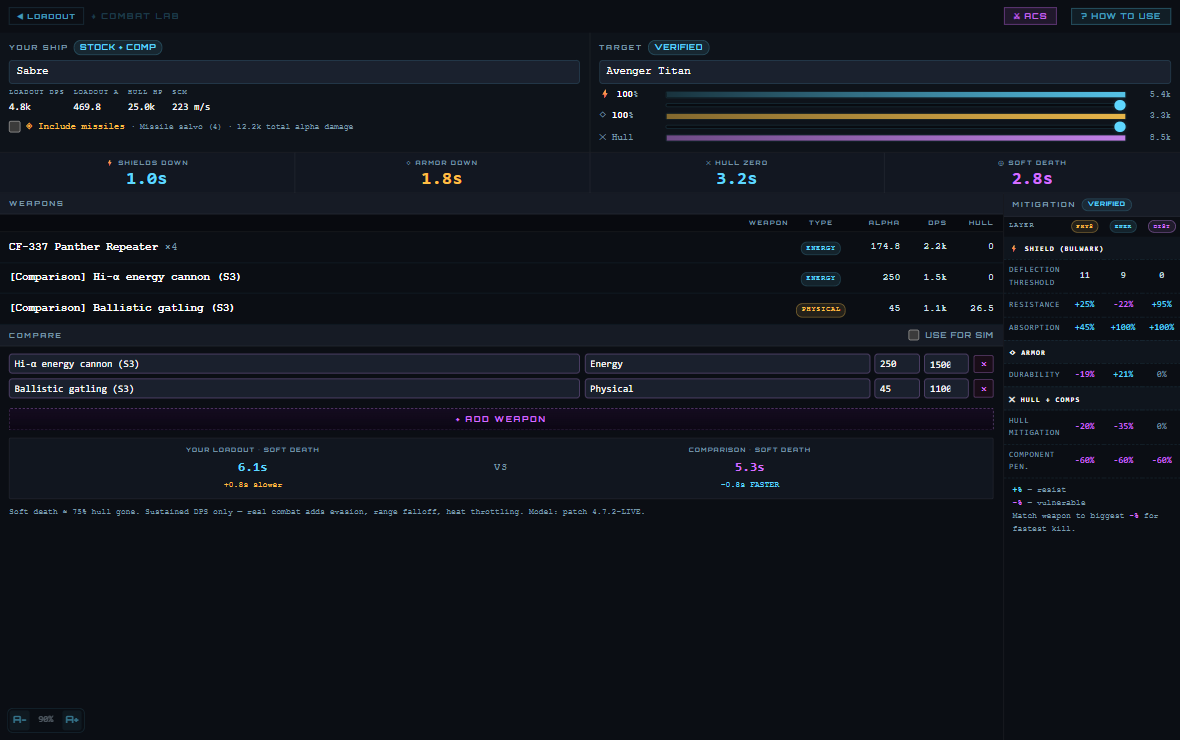
What it does
Pick your ship and a target in the two search boxes at the top. The Combat Lab calculates four key time-to-kill metrics: shields down, armor down, hull zero, and soft death (roughly 75% hull damage, where core systems fail). Click any weapon row to see the full damage chain: how much the shot deals raw (ALPHA), how much the shields absorb (SHIELD), how much armor soaks (ARMOR), how much actually hits hull (HULL), and whether components get penetrated (COMP). The right side shows the target's damage resistances by type (physical, energy, distortion) — positive % = resistance, negative % = vulnerability. Use the shield and armor sliders to simulate a mid-fight scenario (target at 50% shields, damaged armor, etc.). The COMPARE section lets you test alternate loadouts against the same target.
How to use it
- Search and select YOUR SHIP (left side). Your current loadout from the Loadout Bay auto-loads if you opened this page from there; otherwise the ship's stock loadout is used.
- Search and select TARGET (right side). The target's shield, armor, and hull stats appear.
- The four big numbers below (SHIELDS DOWN, ARMOR DOWN, HULL ZERO, SOFT DEATH) are your time-to-kill values. Focus on SOFT DEATH for real combat.
- Click any weapon row to expand the damage chain and see how each layer of protection fails. A yellow ✕ means the shot got deflected (not enough damage to punch through).
- Drag the Shield % and Armor % sliders to model a fight-in-progress. Numbers update instantly.
- Use the MITIGATION table (right column) to pick weapon types that match the target's biggest vulnerability (negative %). Fire distortion weapons at -20% distortion targets for fastest kill.
- (Optional) Toggle Use for sim in the COMPARE section, add hypothetical weapons, and see how they'd perform.
Key features
- Damage Chain Visualization — Click a weapon and watch the 5-stage path: ALPHA (raw) → SHIELD (absorb) → ARMOR (soak) → HULL (structural) → COMP (critical systems).
- Deflection Detection — If a stage shows ✕, the shot bounced. Not enough alpha to crack that layer.
- Multi-Crew Aware — Toggle "⚠ Include missiles" for manned ships (Hammerhead, Polaris) that have turrets. Stock loadout includes manned turrets; pilot weapons only show if toggled on.
- After-Combat Stats (ACS) — If you've flown and logged kills with your overlay, click the ⚔ ACS button to load a recent kill as your target. Pre-populates its damage profile.
- Slider Simulation — Adjust target shields and armor to see the real TTK for fights-in-progress (enemy is already damaged).
- Mitigation Resistances — Physical / Energy / Distortion columns show resist %. Pick the weapon type with the biggest negative (vulnerability) for fastest kill.
Tips
- Soft death (~75% hull gone, system failure) is what matters in PvP. Pressing to full destruction takes much longer and is rarely necessary.
- The simulator models sustained DPS only — evasion, range falloff, heat throttling, and luck aren't factored in. Treat TTK as a floor, not a prediction.
- If your loadout has no data (rare new ship), open it in the Loadout Bay first, configure it, then come back—the link passes your actual weapons.
- The ACS (After-Combat Stats) dropdown only populates if your overlay has recorded kills in-game. No kills = no history.
⚡ SHOWDOWN
Quick 1v1 ship comparison. Pick two ships, see who wins based on DPS vs. HP, and browse their raw stat deltas.
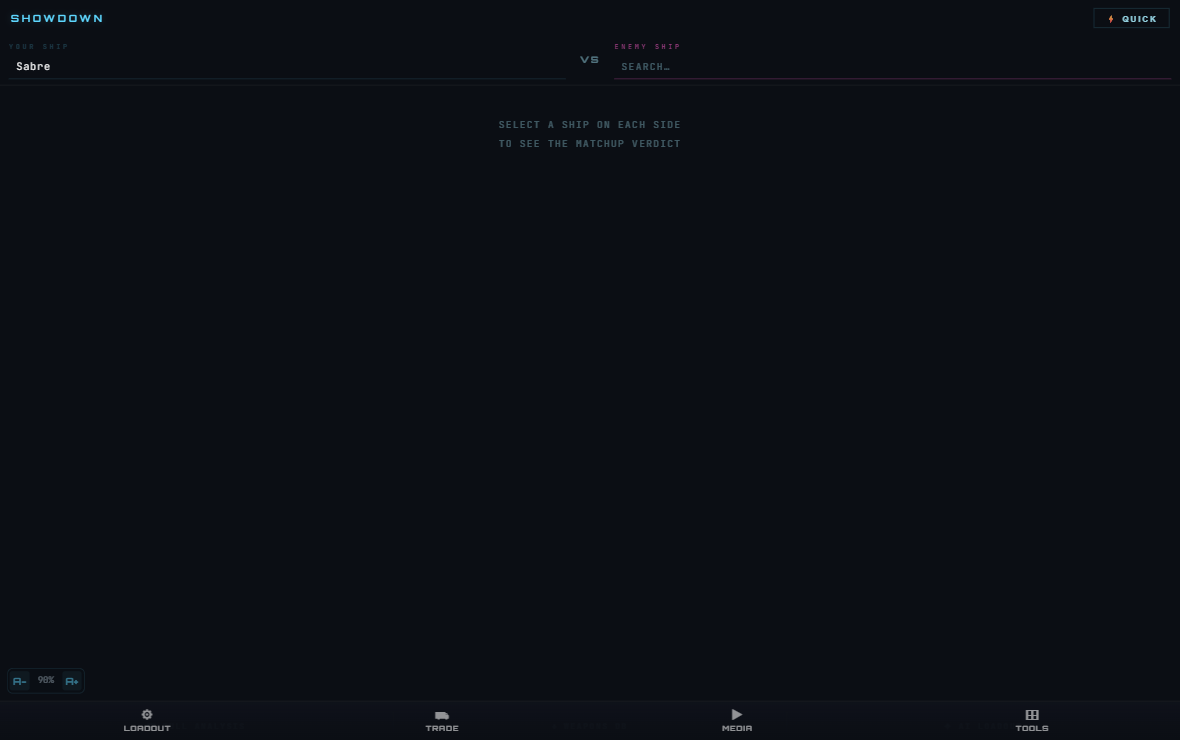
What it does
Showdown is a lightweight alternative to the Combat Lab—no slots, no loadout customization, just raw ship-versus-ship. Pick your ship on the left and an enemy on the right. The page calculates two time-to-kill values: how fast you kill them, and how fast they kill you. If your TTK is 20% faster, you get "ADVANTAGE: YOU." If it's within 20%, it's a "CLOSE FIGHT" (pilot skill decides). The page also shows a stat-by-stat breakdown: DPS, shield HP, hull HP, cargo, and crew count, highlighting who wins each category. Use the QUICK button to randomize both ships and generate a surprise matchup.
How to use it
- Type a ship name in the YOUR SHIP search box and click to select.
- Type a ship name in the ENEMY SHIP search box and click to select.
- The verdict appears: ADVANTAGE: YOU, ADVANTAGE: ENEMY, or CLOSE FIGHT.
- Scroll down to see stat-by-stat comparison: DPS, shields, hull, cargo, crew. Highlighted rows show who's stronger in each category.
- Click ⚡ QUICK to randomize both sides and play "who'd win?"
- Use the FULL ANALYSIS link to jump to the detailed Combat Lab for this matchup.
Key features
- Verdict in Seconds — One click per side, instant TTK calculation. No loadout building required.
- Fleet Shortcuts — If you have a saved fleet in the overlay, those ships show first in the picker (marked ⛵).
- URL Deep-Linking — The page saves your matchup to the URL hash (#a=Sabre&b=Hornet). Refresh and the same matchup reloads.
- Stat Deltas — DPS, shield HP, hull HP, cargo, crew. Shows who wins each category.
- Quick Match Button — Randomize both ships instantly for casual "who'd win?" sessions.
Tips
- Showdown uses stock loadouts only. For a true matchup with custom weapons, use the Combat Lab instead.
- Fleet ships (your saved fleet from the overlay) sort to the top of both pickers—easy to compare within your own hangars.
- TTK advantage of 20%+ is decisive. Smaller gaps (Close Fight) heavily favor the better pilot.
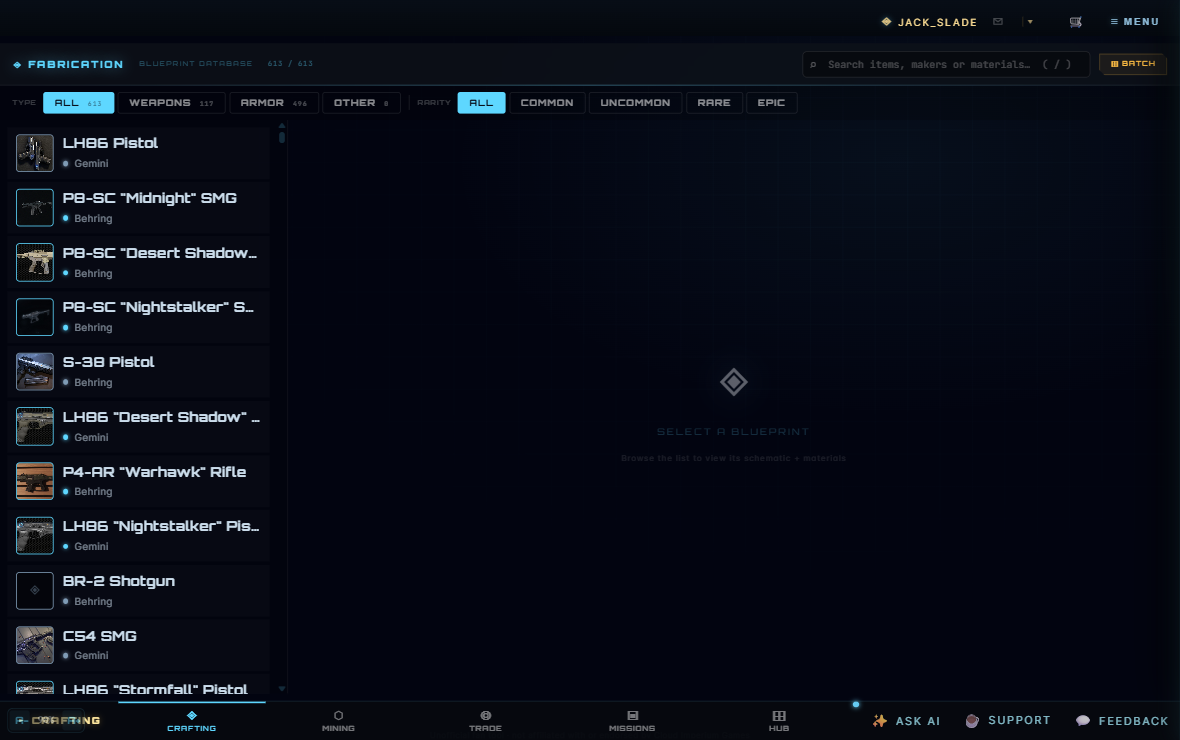
◈ CRAFTING
Browse fabrication blueprints with full material breakdowns, craft times, rarity, and direct links to mining for each ingredient.
What it does
The Crafting database lists all Star Citizen fabrication blueprints. Search or filter by category (WEAPONS, ARMOR, OTHER) and rarity (COMMON, UNCOMMON, RARE, EPIC). Click any blueprint to see its schematic: product image, craft time, full ingredient list with quantities, dismantle returns, and in-game wiki link. Each ingredient has a mineable flag — if it's ship-mineable, a direct "⛏ MINE" button jumps to the Mining app with that material pre-selected. Build a shopping list by clicking "ADD TO BATCH"; the batch panel on the right aggregates all ingredients across all selected recipes, with links to mine the mineable ones.
How to use it
- Use the TYPE and RARITY filter chips to narrow the blueprint list. Type "/" to focus the search box instantly.
- Click any blueprint in the left list to view its schematic on the right. On narrow screens, this slides over the list.
- In the schematic view, you'll see: craft time, total material count, whether ingredients are mineable, and dismantle returns if you break it down.
- For each ingredient, check if it's mineable (⛏). Click the MINE button to jump to the Mining app with that material pre-filled.
- Click ADD TO BATCH to add this recipe's ingredients to your batch list. The badge on the ⊞ BATCH button shows how many recipes are batched.
- Open the ⊞ BATCH panel (top-right) to see your full shopping list: all materials needed across all batched recipes, aggregated and sorted by quantity.
Key features
- Full Schematic — Product image (with corners decoration), rarity & class badges, manufacturer, in-game description, and wiki link.
- Material Breakdown — Every ingredient shows: name, rarity tier, RS signature (if mineable), quantity in SCU, and a mineable link.
- Mineable Flag — If a material is ship-mineable (rocks, ore, gas), the MINE button appears. Click to jump to Mining with that material pre-selected.
- Batch Aggregation — Add multiple recipes and see the combined ingredient list. Total materials needed across all batched items, with mineable badges per ingredient.
- Dismantle Returns — Some recipes return salvageable materials if you break down the finished product. Shows what you get back.
- Narrow-Window Drill-In — On small screens (overlay windows, mobile), the blueprint list goes full-width; clicking a blueprint slides in the schematic with a BACK button to return to the list.
Tips
- Use the BATCH panel to gather all materials at once. Sort by quantity (highest first) to tackle the bottleneck ingredients first.
- The RS (Rarity Signature) number is your mining scanner signature—look for rocks / deposits with that RS value on your scanner to find the material.
- Not all ingredients are mineable (some are ground-based or mission rewards). The "BUY / GROUND" label indicates you'll need to acquire them another way.
- Craft time shows as a readable duration (e.g., "5m 30s") or a label like "Quick" if the blueprint defines one.
Economy
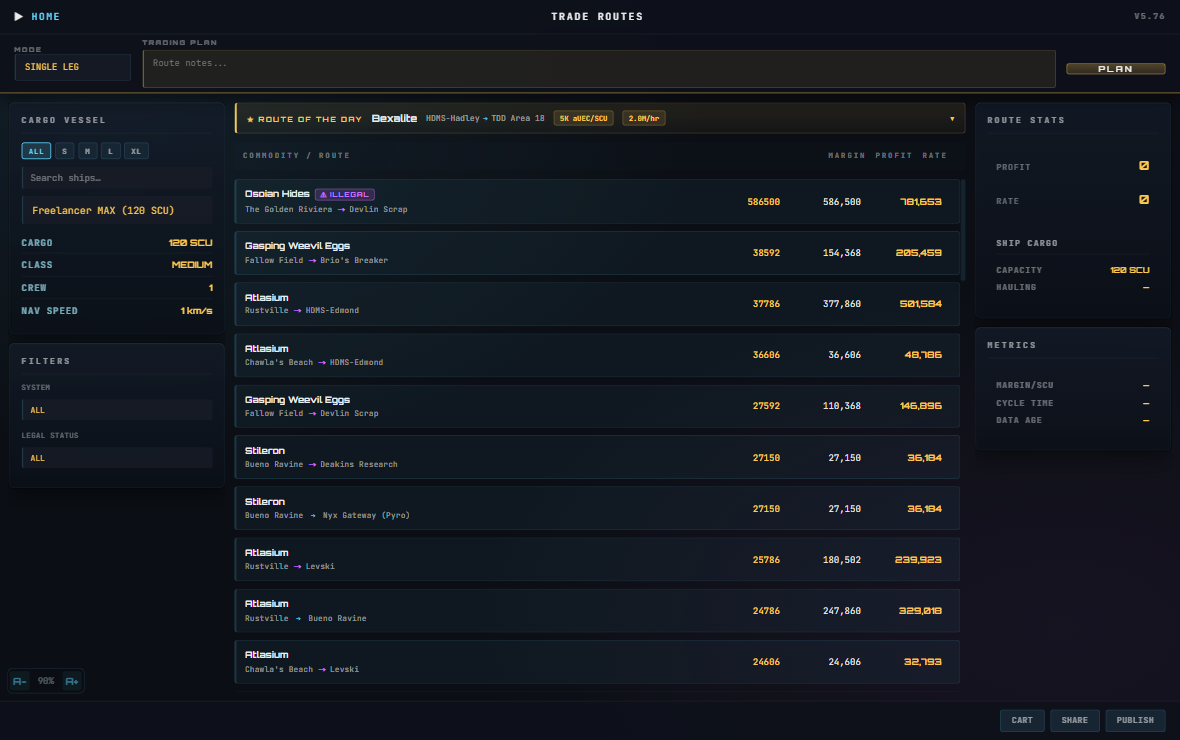
⛟ TRADE ROUTES
Browse profitable commodity routes or build your own multi-leg trading plan with real-time margin & hourly earnings.
What it does
H.U.D Manager calculates trading routes between terminals. Pick your cargo ship, select a system (Stanton, Pyro, cross-system), and filter for legal trade only or include contraband. The app sorts routes by profit margin per SCU and hourly earnings based on your ship's cargo capacity and estimated cycle time. Click any route to see the full mission brief: departure terminal, destination, all legs if it's a multi-stop run, total profit, and a button to view the route on the starmap.
How to use it
- Pick your cargo ship from the left panel (or search for a specific model). Your cargo capacity auto-fills.
- Choose a system filter: ALL (all routes), STANTON, PYRO, NYX, or CROSS-SYSTEM (between systems).
- Toggle LEGAL ONLY to exclude contraband runs if you want.
- Browse the routes in the center. Routes are sorted by hourly earning rate (aUEC/hr) and show profit per SCU and estimated profit per run.
- Click any route row to expand it and see the mission brief: buy location → sell location, all waypoints, and a STARMAP button to plot the course.
- Optionally, build your own plan: switch to BUILD PLAN mode in the hero strip, pick commodities leg-by-leg, and save it for later.
Key features
- Ship filter + stats — Select ship, view cargo capacity, and see how many SCU you can haul per run.
- System filters — ALL, STANTON, PYRO, NYX, or CROSS-SYSTEM routes; legal-only toggle to skip contraband.
- Profit calculation — Displays margin per SCU, total profit per run, and hourly earning rate (aUEC/hr) based on cycle time.
- Mission brief — Expand any route to see buy/sell terminals, waypoints, commodity names, quantities, and system locations.
- BUILD PLAN mode — Manually assemble multi-leg trades and save them for later; shows cumulative profit.
- SAVED PLANS — Your custom plans show as cards with preview legs and stats; load or delete them.
- Contraband tags — Illegal commodities are marked with a magenta ⚠ ILLEGAL badge.
Tips
- Cycle time = travel time + loading. Longer routes (cross-system) take 45+ minutes; short Stanton routes 15–20 minutes. The app factors this into hourly rate.
- Swap ships to find the best routes for your current vessel. Larger ships carry more profit in absolute aUEC but don't always have the best hourly rate.
- Contraband trades pay more margin per SCU but flag you as a criminal; route around UEE patrol points if wanted.
- Multi-leg journeys (2-HOP mode) chain buy → sell → buy again. Profits stack across both legs.
- Data age shown in METRICS panel — refresh if prices look stale in-game.
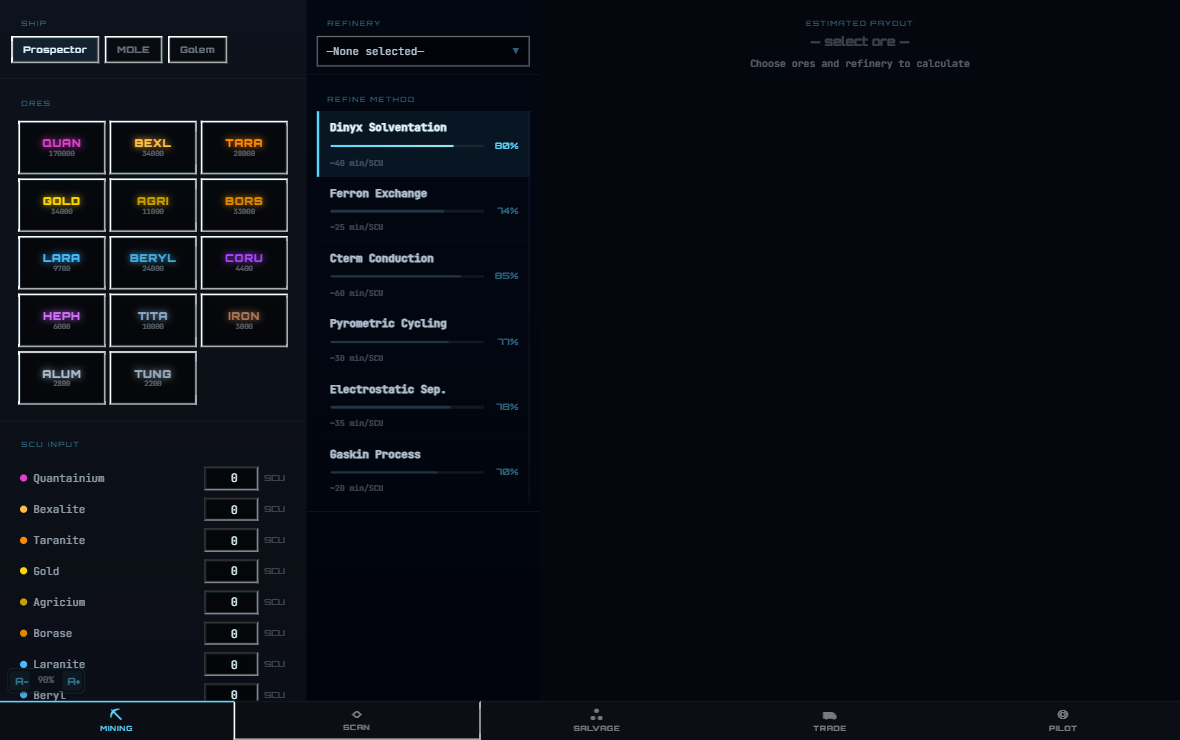
⛏ MINING
Live rock scan reader that identifies minerals, alerts on premium finds, and shows refinery & sell locations.
What it does
H.U.D Manager's mining module reads your in-game scanner display using screen capture OCR (optical character recognition). Aim your mining laser at a rock, hit START SCAN, and the app reads the mineral composition directly off your HUD. It identifies each mineral, shows its tier (legendary, rare, common), sale price, how many rocks contain it, and a signature number (RS) — the numerical code your scanner displays. The SCAN tab also has a manual signature decoder: enter the RS value and optional rock count, and it tells you what mineral you're looking at without needing the full panel scan.
How to use it
- Open the SCAN tab at the bottom of the mining page.
- Hit ⊞ SET SCAN AREA (or ⊞ ADVANCED ZONE for fine-tuning). Drag a rectangle over the mining scan panel on your screen to set the capture region. Save it once — the app remembers for next time.
- Point your laser at a rock in-game and hit ▶ START SCAN. The app reads your screen live and fills the mineral list automatically.
- Open WATCHLIST to select minerals you care about (legendary + rare defaults available, or pick individually). When a watched mineral is detected, you'll see a TARGET LOCK banner + audio alert; non-watched minerals show a quiet notification.
- The IDENTIFIED MATERIAL block shows the mineral name (huge, glowing), verdict (MINE or SKIP), tier badge, sale price, and optionally: where to refine it, where to sell it, and what gear (mining head, modules) is recommended for it.
- For manual lookups: expand SIGNATURE DECODER, enter the RS number from your scanner. Optionally enter rock count (1–10). The app divides RS by mineral base price to identify what you're looking at.
Key features
- Live OCR scan — Reads mineral % composition directly off your in-game HUD; no manual input needed.
- Mineral identification — Shows mineral name (cyan/amber/magenta tier), sale price, rock count, and RS signature.
- Signature decoder — Manual RS→mineral lookup: enter cluster RS value, optionally rock count, get material name.
- Watchlist with alerts — Check the minerals you want. TARGET LOCK (banner + chime) fires when watched mineral detected; others show quiet notification.
- LOGISTICS panel — Where to refine this mineral, which terminals buy it, and best sell prices (auto-loaded per terminal).
- RECOMMENDED GEAR — Mining head class and module suggestions (cooler, power plant features) tuned to this mineral's hardness.
- Haul log — Track mined materials and their hauls over a session.
Tips
- Scan area alignment is a one-time setup. Match the pixel coordinates where your mining scan panel appears on your screen (usually center or off-center depending on HUD scale).
- Full panel mode (default) reads the right-side mineral % breakdown. CENTER mode reads just the rock name at your crosshair (faster, less detail).
- RS (signature) = mineral base price × rock count. A 3,170 RS Quantanium usually means 1 rock (base 3,170) or 2 Quantanium (base ~1,585 each).
- Watchlist quick-pick buttons: ★ LEGENDARY (Quantanium, Bexalite, Borase), ◆ RARE, ↑ HIGH VALUE (≥8k/SCU per material).
- Non-watched minerals are never silent — you'll get a quiet notification. This keeps you aware of everything you scan.
- Crafting materials section shows if a mineral is used in ship/weapon upgrades in Wikelo barter contracts.
⛬ SALVAGE
Calculate wreck salvage yields (RMC and CM), factor hull condition, split earnings with crew.

What it does
H.U.D Manager's salvage calculator helps you value wreck hauls before committing to salvage. Input your salvage ship (Vulture, Fortune, Salvation, or Reclaimer), how much RMC (Recycled Material Composite) and CM (Construction Materials) you salvaged in SCU, and the target sell location. The app calculates payout based on best-known prices, factors hull condition (damage reduces yield), and splits earnings among crew members. It also provides a reference table of buy-back prices per terminal so you can compare payouts.
How to use it
- Pick your salvage ship (Vulture, Fortune, Salvation, or Reclaimer). Ship cargo capacity and crew count auto-fill.
- Adjust the HULL CONDITION slider (0–100%) — intact = 100%, damaged reduces yield proportionally.
- Enter SCU salvaged: RMC (hull scraping yields) and CM (structural breakdown, munching, yields). You can enter decimals (e.g. 3.5 SCU).
- Pick a SELL LOCATION or leave it blank for auto best-price. The app calculates payout instantly.
- See the ESTIMATED PAYOUT hero display. Below it: MATERIAL BREAKDOWN (per-material value and best-price terminals) and CREW SPLIT (adjust crew count, see per-person share).
- Tap the "SELL PRICES REFERENCE" section to see all known buy terminals, prices per material, and which location pays best.
Key features
- Ship selection — Vulture, Fortune, Salvation, or Reclaimer; shows cargo capacity and default crew count.
- Hull condition slider — 0–100%; 100% = intact yield, lower % reduces RMC/CM pulled proportionally.
- Material inputs — RMC and CM in SCU; supports decimals for partial loads.
- Sell location picker — Auto-select best price or choose specific terminal (Stanton or Pyro locations).
- Payout calculation — Shows total aUEC, factors hull damage, handles cargo overage (caps at ship max).
- Crew split — +/− crew count buttons; shows total and per-member payout. Crew count auto-set per ship (1 for single-crew, 2–5 for large ships).
- Reference table — Terminal-by-terminal RMC and CM prices (UEX 4.8.1); sortable by terminal or price.
Tips
- RMC (8,300 aUEC/SCU best) pays less per SCU but higher volume. CM (13,000 aUEC/SCU best) pays ~60% more but you get less material from a wreck.
- Hull condition is critical — a 50% damaged wreck yields half the material. If a wreck is too degraded in-game, skip it.
- Best payout for RMC: Terra Mills (Stanton) or Seer's Canyon (Pyro). Best for CM: MIC-L5 (Stanton).
- For solo play: crew count = 1. For group: use 2+ to see splits. Earnings are not auto-divided server-side; you handle the split.
- Prices are UEX community data (4.8.1). Verify in-game before large hauls — prices can shift with patches.
◈ WIKELO EMPORIUM
Browse and filter Wikelo barter contracts, see ingredient sources, craft ships and weapons with ease.

What it does
The Wikelo Emporium page is a browser for Wikelo faction contracts. Wikelo runs a barter system: you gather materials (minerals, creature drops, combat trophies, crafting components) and trade them for ships, weapons, armor, and utilities. This page lists all known contracts, shows exactly what ingredients each one needs, where those materials come from (mining, hunting, FPS, salvage, etc.), and what reward you get. You can filter by reward type (weapons, ships, utilities, etc.), sort by name or favor cost, search by keyword, and use the AI to ask "what can I make with…?" and get filtered results.
How to use it
- Browse or search: type in the search bar to find contracts by name, material, or reward.
- Filter by category chips (Currencies, Weapons, Armor, Ships, Clothing, Utilities) at the top. Toggle HIDE BROKEN to skip contracts that are uncompletable or bugged.
- Toggle ◈ EARNS FAVORS to show only contracts that reward Wikelo Favor currency (good for farming favor).
- Set your Wikelo Favor balance in the top-right input. Toggle AFFORDABLE to show only contracts within your current favor budget.
- Click any contract card to expand it. See the full ingredient list with sources (where to mine/hunt/earn each material), reputation requirement (if any), reward, and ship component loadout (if the contract gives a ship).
- Ask the AI: "What can I make with [materials]?" or "Cheapest ship I can get?" or "Best armor from Wikelo?" and it filters the contracts to match.
Key features
- Full contract list — All Wikelo barter contracts, community-tracked; updated when new contracts are discovered.
- Ingredient sources — Hover/expand to see WHERE to get each material (mining locations, hunting creatures, FPS objectives, etc.).
- Category filter — Currencies (Favor contracts), Weapons, Armor, Ships, Clothing, Utilities; counts shown per category.
- Status badges — BROKEN (incompletable / buggy), REP (requires reputation rank), EARNS FAVORS (currency contract).
- Favor balance tracking — Enter your current Wikelo Favor in the top-right. AFFORDABLE filter shows only contracts you can afford.
- Reputation locks — Some contracts require a rank with Wikelo. The contract shows the required rank in an expanded detail panel.
- Ship component loadouts — Contracts that reward ships show recommended power plant, shield, QD, cooler, and radar components.
- AI assist ("What can I make?") — Natural language questions parsed to filter contracts and set sort order. Example prompts: "Cheapest ship I can get," "Weapons under 5k favor," "High-value rewards."
Tips
- Wikelo data is community-tracked (not published by CIG) — in-game contracts may differ slightly. Always verify the ingredient list in-game.
- Incompletable / BROKEN contracts are marked — these are known bugs or expired missions. Skip them.
- Favor farming: toggle ◈ EARNS FAVORS to see only Currencies contracts (mundane tasks that reward Wikelo Favor).
- Materials span multiple activities: some ores from mining, some creature drops from hunting, some from FPS objectives (ASD Onyx Facility). Plan a mixed session to gather ingredients.
- Ship loadout suggestions are based on community consensus — test in-game before committing expensive materials.
- Reputation required: if a contract shows "REP: Rank 3" it means you need that rank with Wikelo faction. Earn it through simple Currencies contracts first.
⛁ COMMISSARY
Find buy-back prices for every FPS item, armor, weapon, clothing, and component across all terminals.
What it does
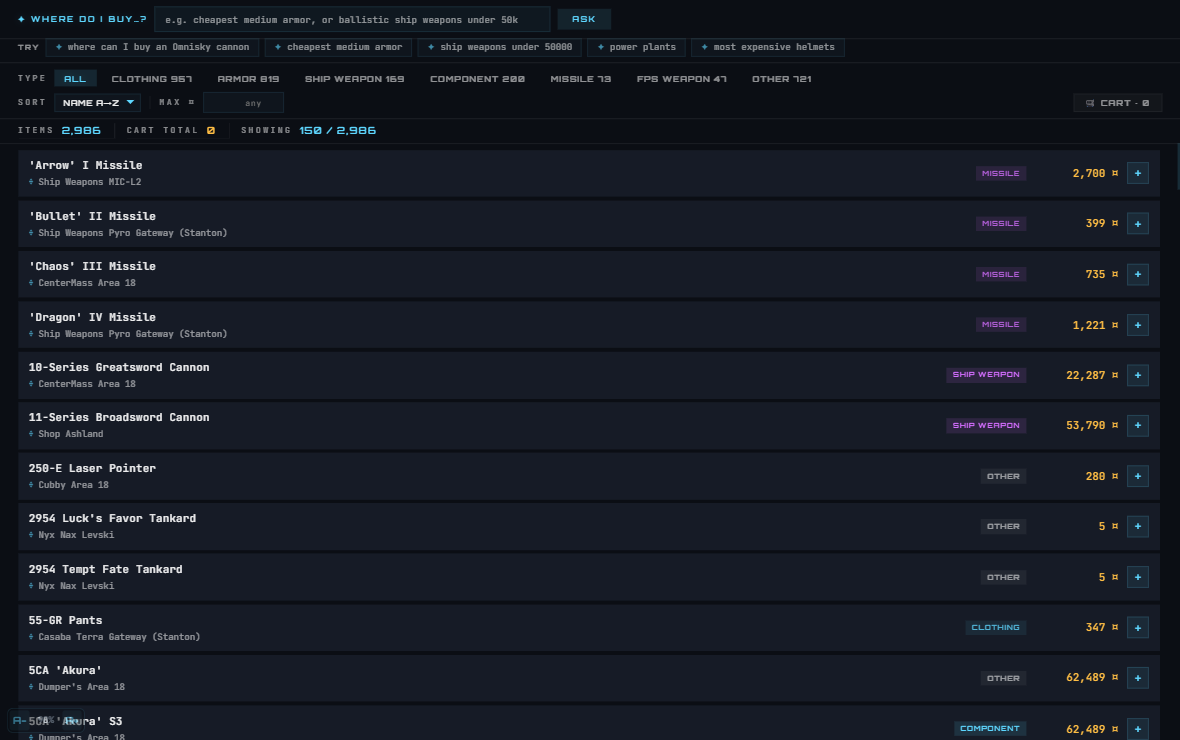
The Commissary is a searchable price browser for everything you can buy: FPS weapons, armor, clothing, ship components, missiles, and ship weapons. It aggregates buy prices from all known shops and terminals across Stanton and Pyro. Search for an item, filter by category (armor, weapons, clothing, etc.), sort by name or price, and see which terminal has it and for how much. Add items to a shopping cart (server-synced if you're signed in) and see your total. Hover over any item for a tooltip with category, stats, and images.
How to use it
- Search any item name (e.g., "Ballistic rifle," "combat armor," "power plant") in the search box. Results update live.
- Filter by category: Clothing, Armor, Ship Weapon, Component, Missile, FPS Weapon, or Other. Counts per category shown.
- Sort by name (A→Z), price ascending (cheapest first), or price descending (most expensive first).
- Set a MAX PRICE (optional) to hide items above your budget.
- Hover over any item card to see a tooltip with stats (damage, size, heat signature, armor resistance %), terminal location, and an item image if available.
- Click the + button to add an item to your cart. (Requires sign-in via Pilot account.) Click again to remove.
- Open the 🛒 CART panel (bottom-left) to see your list, total aUEC cost, and a button to open the full cart page for checkout.
Key features
- Item search — Real-time search across 2,000+ items by name and terminal location.
- Category filter — Clothing, Armor, Ship Weapon, Component, Missile, FPS Weapon, Other; item counts per category.
- Price range filter — Set MAX PRICE to exclude pricey items (e.g., hide everything over 50k aUEC).
- Sort options — Name A→Z, Price ascending (cheapest), Price descending (most expensive).
- Terminal location — Each item shows which shop sells it and system (Stanton, Pyro, Nyx).
- Hover tooltips — Category badge, item image, stats (armor resistance %, weapon damage type, component size, etc.).
- Shopping cart — Add items, see instant total, sign in to sync across devices. OPEN FULL CART → links to checkout.
- AI assist ("Where do I buy…?") — Ask "Cheapest medium armor," "Ballistic weapons under 50k," "Power plants" and it auto-filters results.
Tips
- Prices are UEX community data — they vary by shop and stock and may be out of date. Verify in-game before large purchases.
- Multiple shops may carry the same item. The page shows all known locations; pick the closest or cheapest.
- Sign in with your Pilot account to sync cart across devices — your shopping list follows you.
- Armor categories: Helmet, Chest/Torso, Arms, Legs, Core. Filtering by "Armor" shows all. Look for slots you need.
- Ship weapon and component prices are buyback prices (cost to procure). In-game pricing may vary for stores vs. salvage vs. crafted items.
- FPS weapons show manufacturer (MFR) and size. Higher size = heavier but more damage per shot.
Fleet & Navigation
📦 HANGAR
View and export the full acquisition brief for your loaded ship—where to buy each component and total cost.
What it does
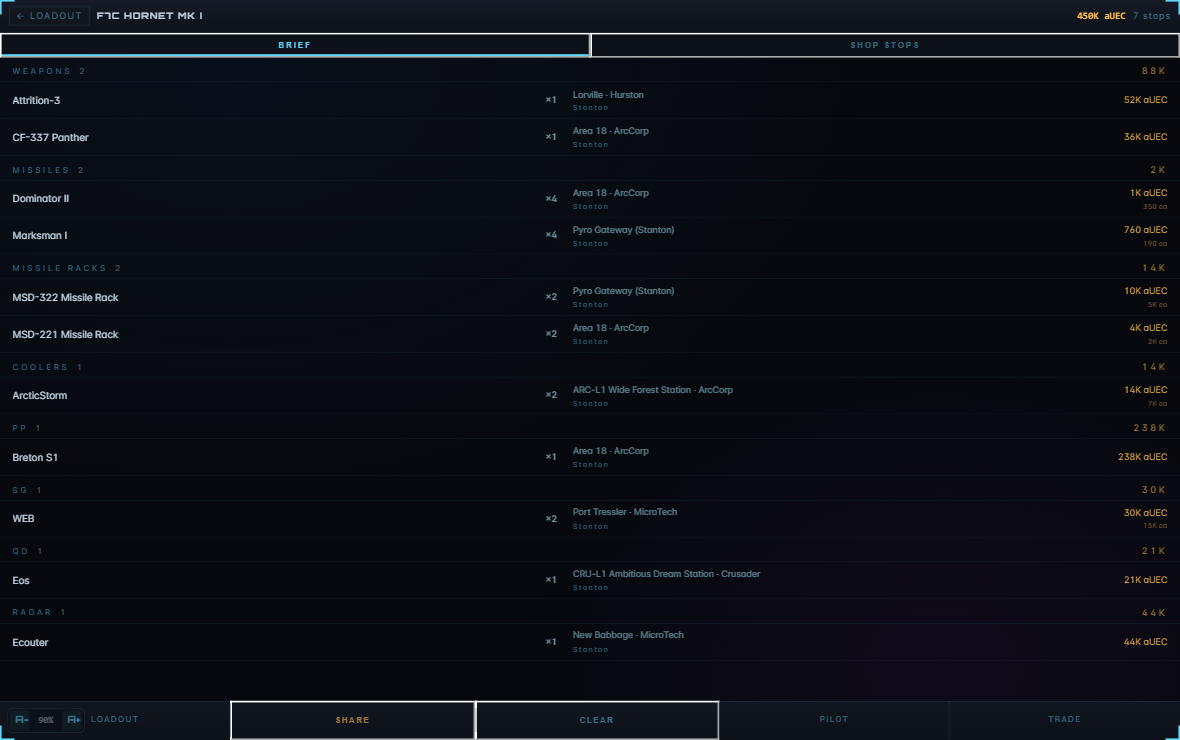
The Hangar app takes the components you've configured in your loadout and builds a shopping list. It organizes everything by category (weapons, shields, power plants, etc.), shows you where to buy each item, the quantity you need, the price per unit, and the total cost. A separate "Shop Stops" tab groups items by location, so you can plot an efficient acquisition route across the verse.
How to use it
- Load or build a ship in the Loadout Bay.
- Tap the 📦 HANGAR button (or navigate to the Acquisition Brief page).
- View the BRIEF tab to see all components grouped by category with pricing.
- Switch to SHOP STOPS to see items grouped by location and system—visit the stops in any order you like.
- Tap SHARE to copy a link to this brief and send it to a wingmate.
- Tap CLEAR to wipe the brief and start over.
Key features
- Category organization — Components grouped logically (weapons, shields, thrusters, etc.) with subtotals per category.
- Location lookup — Each item shows the shop, location, and system so you know exactly where to dock.
- Shop Stops tab — Routes your acquisition by location; shows which items to grab at each stop and the subtotal per stop.
- Pricing — Unit and total costs displayed in aUEC; includes both single items and quantities.
- Share link — Generate a shareable URL containing the full brief so others can see what you're building.
Tips
- Use Shop Stops if you're doing a real shopping run—they're sorted by total value at each stop so you hit the biggest buys first.
- Not all components have pricing data. Items with no location show a "—" in the price column—you may need to find these manually.
- Share your brief with your org or guild to coordinate group shopping trips.
🛒 CART
Persistent shopping list synced across your account—add items from the Loadout Bay and plan multi-stop acquisition routes.
What it does
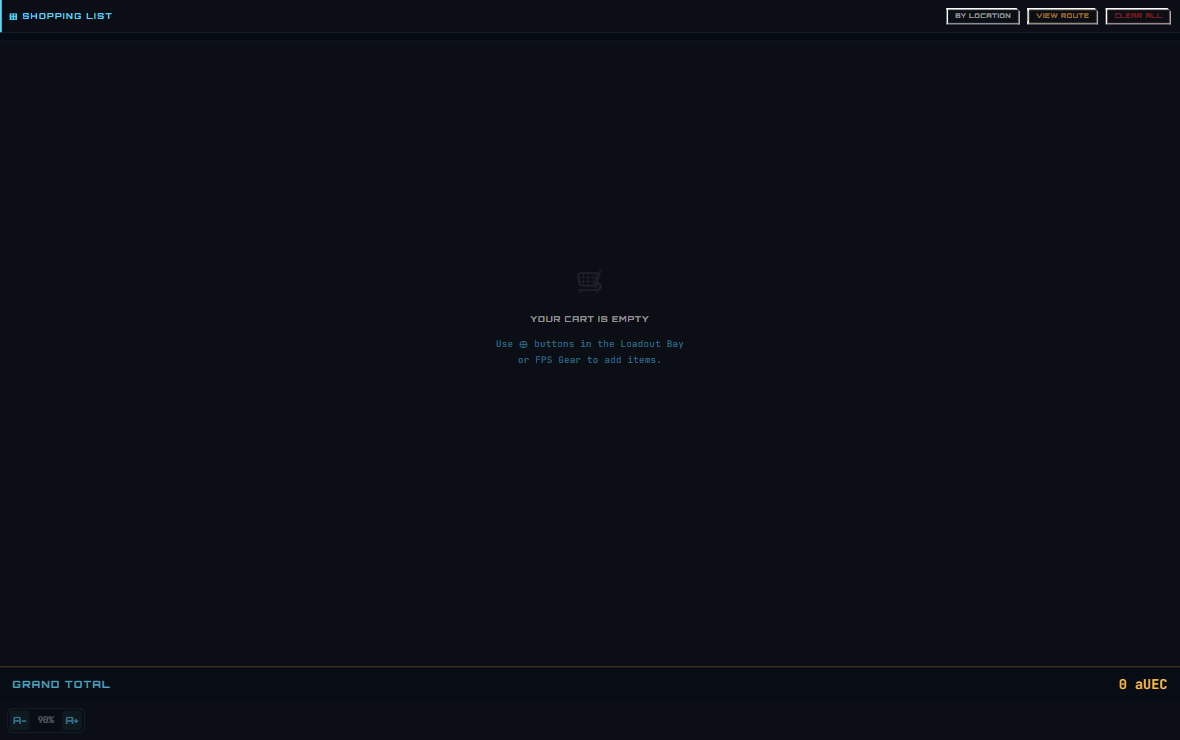
The Cart keeps a running shopping list saved to your account. When you configure your ship in the Loadout Bay, you can add only the components you've changed to the cart (not every component). The Cart shows you where to buy each item, auto-organizes stops, and calculates the total cost. You can also filter by system (Stanton/Pyro/Nyx), toggle between shop-grouped and item-list views, and adjust quantities on the fly.
How to use it
- In the Loadout Bay, tap the + button on a component to add it to your cart (or use the cart count badge in the top bar).
- Open the CART page from the bottom navigation or main menu.
- Review items grouped by shop. The cart auto-organizes stops in an optimized order and shows travel distance between consecutive stops.
- Use the system filter at the top to narrow down to one region if you like.
- Toggle BY LOCATION to switch between shop-grouped and flat item-list views.
- Adjust quantities with the +/− buttons on each item, or delete individual items with the ✕ button.
- Tap CLEAR ALL to empty the cart.
- Tap VIEW ROUTE to open the Star Map and see your acquisition stops pinned on the orbital schematic.
Key features
- Account sync — Your cart persists across sessions and devices; it's tied to your H.U.D Manager account.
- Route optimization — The cart auto-calculates the shortest path through your acquisition stops and displays travel distance between each leg.
- System filter — Show all items, or filter to Stanton/Pyro/Nyx to focus your shopping run in one star system.
- Dual view — Shop view groups items by location (good for planning); list view shows a flat, sortable item table.
- Quantity stepper — Adjust quantity per item without leaving the cart page.
- Star Map integration — VIEW ROUTE opens the map and pins your acquisition stops.
- Grand total — Running cost display at the bottom; updates as you adjust quantities.
Tips
- Add only changed components to keep your cart lean; the cart is for acquiring upgrades, not tracking a full loadout.
- Use the system filter if you're doing a single-system run—it hides shops in other systems and focuses your route.
- The route optimization is smart about distance; if travel time matters, trust the stop order the cart suggests.
- Swapping to list view is useful if you just want to see what you're buying without location detail.
🌍 STARMAP
Interactive orbital map of Stanton, Pyro, and Nyx—navigate systems, find landing zones, trade routes, mining sites, and mission locations.
What it does
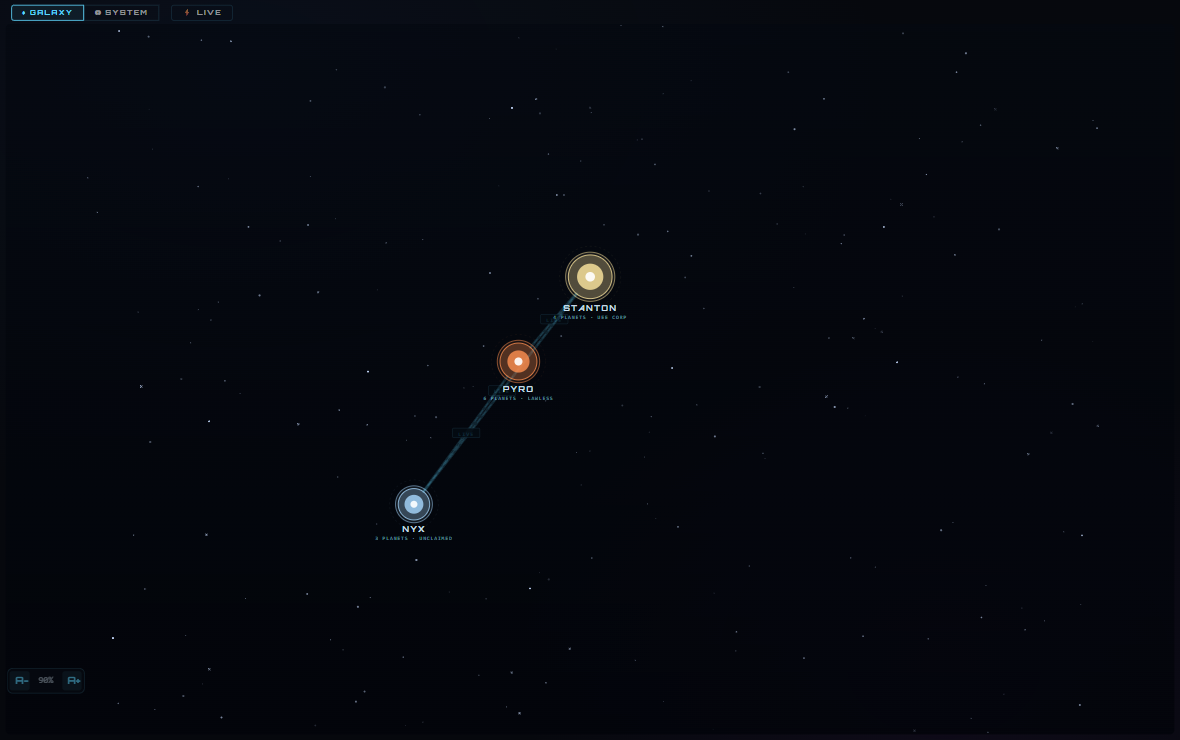
The Star Map is a schematic navigator for the Star Citizen universe. In Galaxy view, you see all three playable systems (Stanton, Pyro, Nyx) and their jump-point connections. Click a system to zoom into an orbital schematic showing planets, moons, stations, landing zones, and points of interest. You can filter by POI type (landing zones, stations, outposts), view trade route highlights, spot mining and salvage sites, and see where missions take place. A live location tracker ("You Are Here") shows your position in-game, and you can pin custom locations.
How to use it
- Open the STARMAP from the overlay or navigation menu.
- Start in Galaxy view to see all systems and jump routes. Click a system name or circle to zoom into that system's orbital view.
- In System view, use the system selector dropdown (top-left) to jump to a different system.
- Toggle POI filters (landing zones, stations, outposts, trade sites) to show/hide locations. Hover over a POI chip to see what it is.
- Look for trade-route overlays (amber lines) to see profitable cargo runs. Mining sites appear as amber triangles; salvage as magenta chevrons.
- Click a planet or station to see details on the right panel: amenities, distance to next stop, landing pads, refinery status, etc.
- Toggle the "LIVE" button to show only playable (in-game) systems; lore-only systems fade out.
- Use the search bar to jump directly to a location by name.
- If the overlay app supports it, route to an acquisition stop and the map auto-pins your shopping destinations.
Key features
- Galaxy + System views — Dual-mode navigation: macro view of all systems and jump routes, then zoom into orbital schematics.
- POI filtering — Toggle visibility of landing zones, stations, outposts, trading hubs, mining sites, salvage sites, and mission locations.
- Trade route overlays — Amber lines show profitable cargo routes between systems; hover to see the commodity and profit margin.
- Live-only toggle — Lore-only systems (like Nyx) can be hidden if you only want playable content.
- Location details panel — Click any POI to see amenities, distance, faction, landing pad count, and other metadata.
- Search — Type a location or system name to jump directly to it.
- Acquisition route integration — If you open the map from the Cart, your shopping stops are auto-pinned on the system view.
- Compact overlay mode — Strips chrome and hides the sidebar when embedded in other tools.
Tips
- Use Galaxy view to plan multi-system trips; the jump-point network shows which routes require detours or boosts.
- Mining and salvage sites are color-coded: amber triangles = resources, amber squares = refineries, magenta = salvage.
- The "LIVE" toggle is useful if you want to focus on 4.8 playable content without Pyro/Nyx lore locations cluttering the view.
- For trade routes, always click the route line to see profitability; some look short but are low-margin runs.
- The stat tiles at the top (planets, stations, etc.) update when you hover a POI—useful for comparing systems at a glance.
● LIVE STATE
Real-time combat telemetry and instance tracking—watch your kill feed, current zone, ship, and nearby pilots in real time.
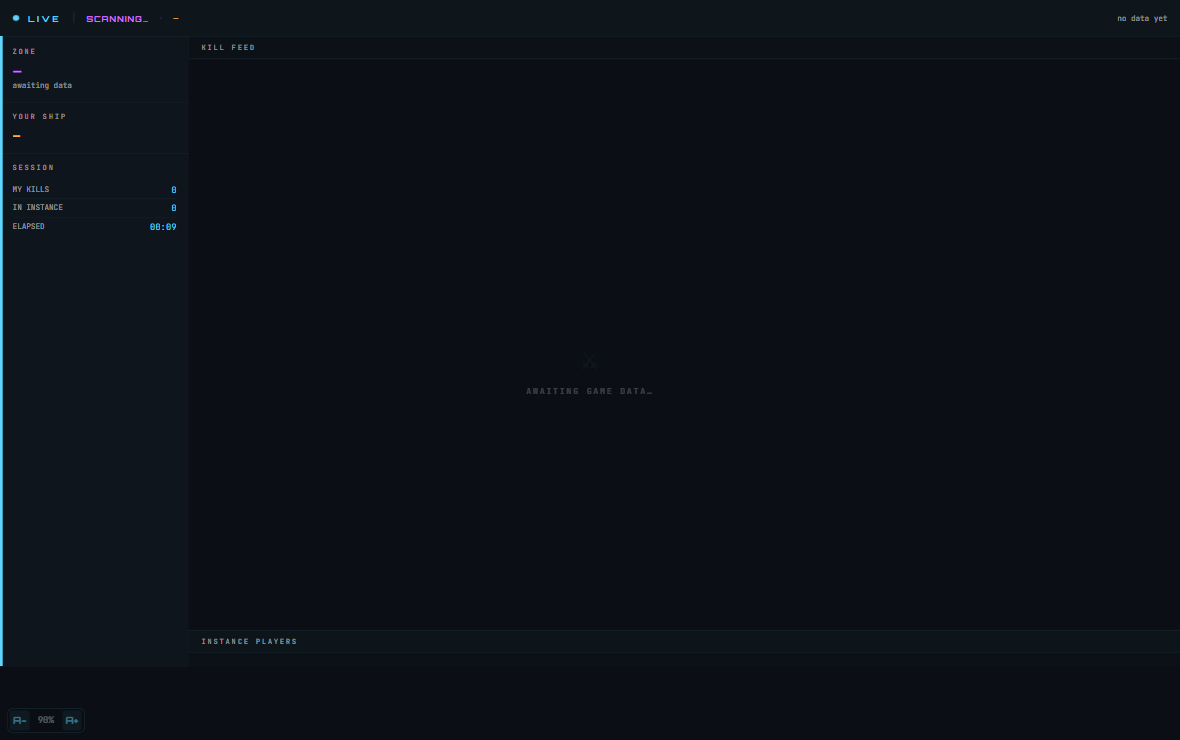
What it does
Live State is a real-time cockpit overlay that mirrors what's happening in-game. It reads Game.log and your overlay's local storage to show your current location, ship, a live kill feed (who killed whom and why), instance player count, your personal kill count, and elapsed session time. It updates as you move, fight, and interact in the verse—a persistent combat and activity dashboard.
How to use it
- Open the LIVE page from the overlay's navigation menu or bottom tab (●).
- The left panel displays your zone, ship, session stats (kills, players nearby, elapsed time).
- The right panel shows a live kill feed (newest at top) with timestamp, killer name, target ship, and reason (if available).
- Below the kill feed is an instance players list—all pilots currently in your server instance with you.
- The "LIVE" indicator and blinking dot at the top confirm the page is receiving updates from your game session.
- The "LIVE" status text updates with the age of the last telemetry: "live" (just updated), "5s ago", "1m ago", etc.
Key features
- Kill feed — Real-time list of all combat events in your instance, with your own kills highlighted in magenta.
- Instance tracking — Shows all players in your server session; highlights your character in a distinctive color.
- Zone and ship display — Live-updating location (planet, landing zone, or gridding) and current ship name.
- Session stats — Your personal kill count, total players in instance, and elapsed time since the page loaded.
- Timestamp for every kill — All kill-feed entries show the exact time of the event in-game.
- Fallback data — If in-game telemetry is stale, the page loads your recent history from Game.log (last ~20 kills).
Tips
- The kill feed is scoped to your instance only—it won't show events in other servers.
- If the "LIVE" indicator turns gray or shows an old timestamp, check your Game.log is being read by the overlay app.
- Your kills appear with a magenta highlight and "YOU" badge for quick scanning of your combat record.
- Use the instance player list to gauge whether your server is busy or quiet; higher count = more PvP/PvE activity nearby.
- The elapsed-time counter resets each time you open the page; it tracks how long *this session* of the Live page has been running, not your in-game session.
📋 MISSIONS
Searchable database of all available missions—filter by type, legality, system, and difficulty; get AI help choosing what to run.

What it does
Missions is a browsable, searchable catalog of all missions available in Star Citizen. You can filter by mission type (combat, bounty, hauling, mining, etc.), legality (legal/illegal), combat difficulty, system (Stanton/Pyro/Nyx), and sort by name, reward, or time-to-complete. It also includes an AI assistant that understands natural-language queries: type "quick legal bounty in Stanton" and it applies the right filters for you. Click any mission card to see the full in-game briefing text, rep rank requirement, enemy count, and mission-giver details.
How to use it
- Open MISSIONS from the overlay navigation or bottom tab.
- Browse all missions or use the filter chips to narrow by type, legality, or system.
- Sort by NAME, REWARD (highest first), or TIME (shortest first) using the sort dropdown.
- Search by mission title or giver name in the search box at the top.
- Click any mission card to expand and view the full mission briefing, reward range, rep rank, and what's involved.
- Use the AI "What should I run?" bar: type a natural-language request like "high-paying solo combat" and the AI applies filters automatically.
- Click one of the example prompt chips (below the AI bar) to instantly apply a preset filter set—no typing needed.
- The stat strip at the top shows total missions, combat-only count, and illegal-mission count across the database.
Key features
- Full-text search — Search by mission title or mission-giver name; results update as you type.
- Multi-filter UI — Chips for mission type (Combat, Bounty, etc.), legality, combat-only toggle, system filter, and sort order.
- In-game mission text — Click a card to read the actual contract briefing as it appears in your mission log.
- AI natural-language assistant — Type "quick solo legal hauling" and the AI auto-applies matching filters.
- Example prompts — Pre-written queries let you instantly apply common filter sets without typing.
- Rich mission metadata — Reward range (min–max aUEC), enemy count, rep rank required, duration estimate, and legality status.
- Pagination — Shows the first 150 results; tap "SHOW MORE" to load the next batch.
Tips
- Use the AI assistant for fast filtering—it's faster than clicking multiple chips if you know what you want to run.
- Sort by REWARD to find high-paying missions; sort by TIME for quick-hit contracts you can chain.
- The COMBAT ONLY toggle is useful if you want mission variety but don't want non-combat jobs cluttering the list.
- System filter is handy when you're in a specific region and don't want to jump systems; set SYSTEM to your current location.
- Illegal missions can be lucrative but flag you as a criminal—use the LEGAL filter to avoid them if you're reputation-building.
⊞ TOOLS
Launcher hub for reference tools, career guides, and specialized calculators—mining, heat, crew, power, stealth, and more.
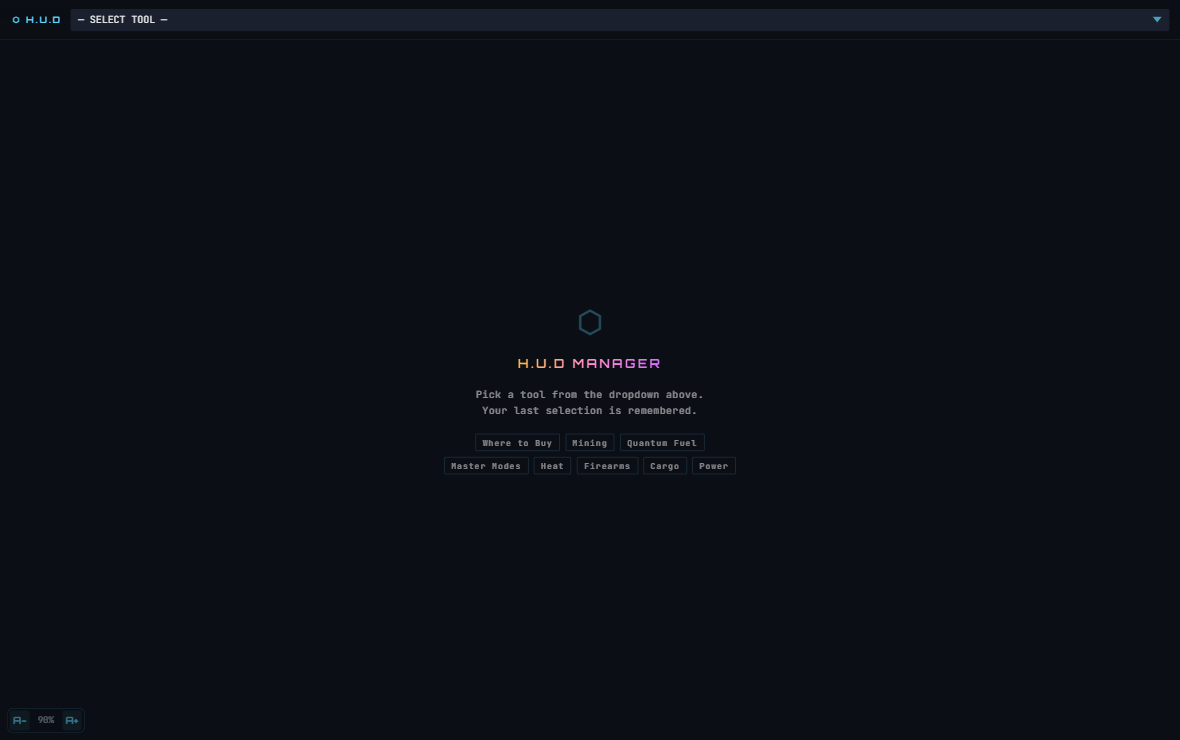
What it does
Tools is a central launcher for all the specialized reference and calculator apps embedded in H.U.D Manager. It's not a single tool—it's a menu. Pick one from the dropdown and it loads in a nested iframe within the Tools page. Categories include reference (Where to Buy, Refinery, Quantum Fuel costs), careers (Bounty guides, Medical, Racing, Exploration), combat (Master Modes, Heat, Damage States, Power, Stealth), FPS (Firearms, Armor, Gear), and industrial (Mining, Salvage, Engineering). The page remembers your last selection so you can quickly return to it on your next visit.
How to use it
- Open TOOLS from the overlay or main navigation (⊞ icon).
- Use the dropdown at the top to select a tool from the list. Tools are grouped by category: REFERENCE, CAREERS, COMBAT, FPS, INDUSTRIAL.
- Click a tool name to load it. The tool appears inside the Tools page as an embedded iframe.
- Alternatively, tap one of the quick-access chips shown on the placeholder (Where to Buy, Mining, Quantum Fuel, etc.) to jump straight to that tool.
- The page remembers your last tool selection—the next time you open TOOLS, it automatically reloads the tool you were using.
- Navigate between tools by selecting a new one from the dropdown; the previous tool stays loaded in memory (fast switching).
Key features
- Organized menu — Tools grouped into 5 categories (Reference, Careers, Combat, FPS, Industrial) for easy discovery.
- Quick-access chips — 8 pre-selected popular tools shown on the placeholder for instant access (Where to Buy, Mining, Heat, etc.).
- Session persistence — Your last-selected tool is remembered and auto-loaded next session.
- Fast switching — Tools are cached in memory; switching between them is instant (no reload).
- 30+ tools — Everything from mining calculators and stealth guides to crew coordinator and cargo tracking.
Tips
- Bookmark your favorite tool by setting the dropdown to it and closing the page—it'll auto-load next time you open TOOLS.
- The quick-access chips are great for your most-used tools; use the dropdown for less-frequent reference pages.
- Many tools are designed for specific activities (mining, combat, salvage). Pick them based on what you're planning to do in-game.
- Tools load in an iframe and are isolated from the rest of the overlay—if one crashes, the others remain unaffected.
Community & Media
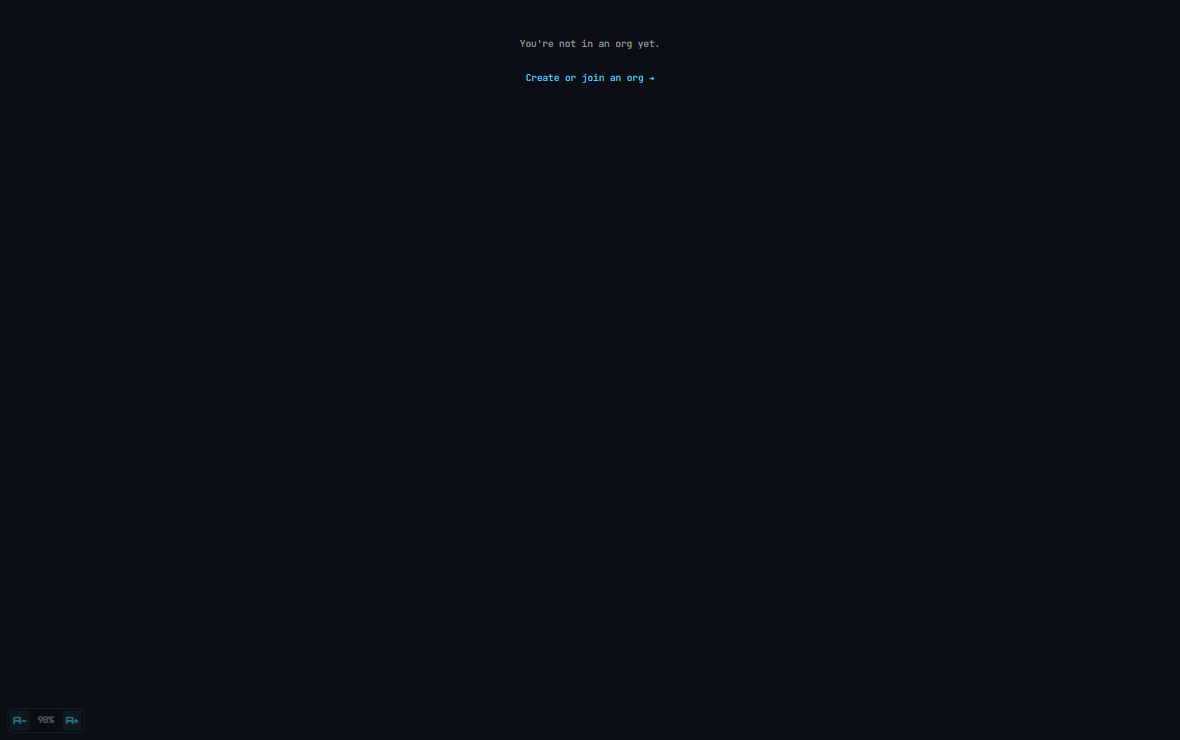
◎ ORGS
Create, join, and manage your in-game organization with roster control and invite codes.
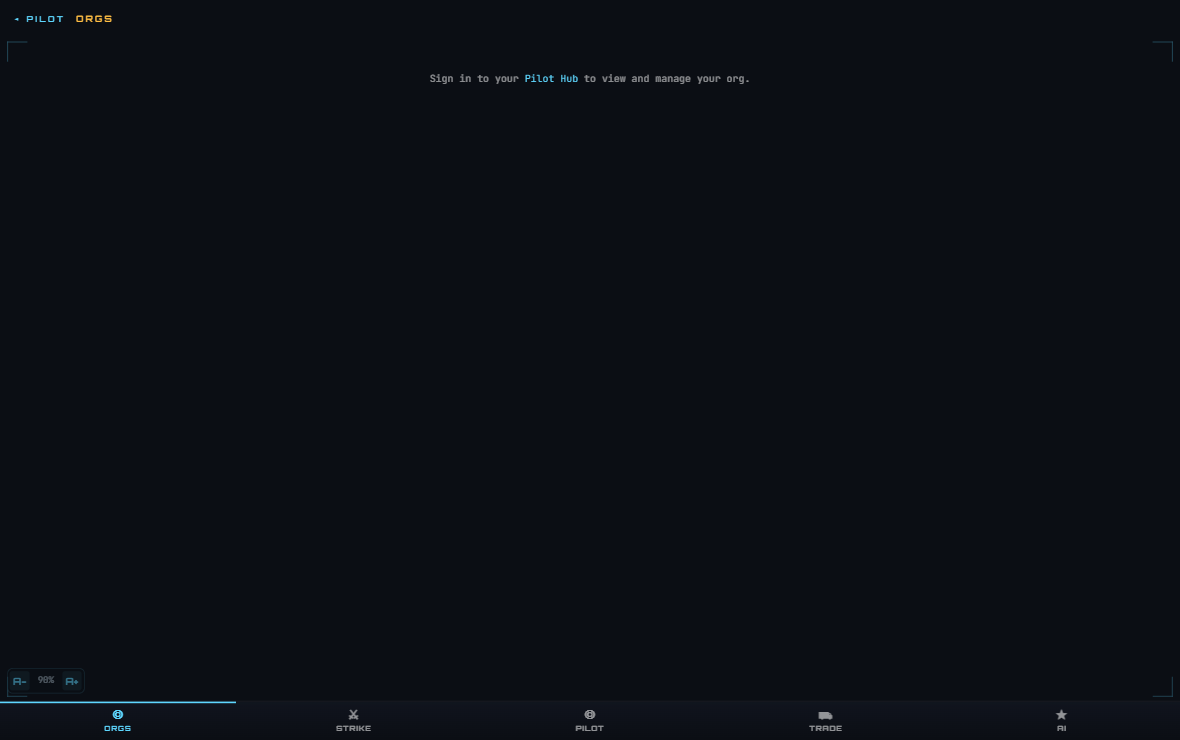
What it does
ORGS lets you create your own organization or join an existing one. Once in an org, you see your full roster with member ranks (commander, officer, member), wings if assigned, and founder controls. Commanders can promote members to officers, demote officers back to members, kick pilots, and generate invite codes for recruitment.
How to use it
- If you're not in an org: Tap "FOUND ORG" and enter a name (e.g. "Star Haulers United"), a 3–6 character tag (e.g. "SHU"), and an optional description. The org is created instantly.
- To join an existing org: Get an 8-character invite code from a commander or officer, paste it into "INVITE CODE", and tap "⊕ JOIN ORG".
- View your org: The card shows your org tag in large type, member count, founding date, and full roster sorted by role.
- Manage roster (commanders only): Use the buttons next to each member to promote/demote/remove pilots.
- Generate or revoke invites (commanders/officers): Tap "⊕ GENERATE INVITE" to create a shareable 8-character code. Share it with recruits.
- Leave or disband: Officers/members tap "↩ LEAVE ORG". Commanders tap "✕ DISBAND" to shut down the entire org (requires confirmation).
- View all orgs: Switch to the "DIRECTORY" tab to browse all registered organizations and member counts (no join required to view).
Key features
- Create in seconds — name, tag, description; org is live immediately
- Role-based access — commanders control invites and roster; officers can see members; members view org info only
- Invite codes — 8-character shareable codes expire never; one active code per org at a time
- Roster view — pilots color-coded by role; shows assigned wing if any
- Org directory — browse all public orgs and member counts
- Confirmation on destructive actions — leaving/disbanding requires a second tap to confirm
Tips
- Your pilot handle displays in the bar at the top (◆ YOURNAME) so squad mates know who to look for.
- Share your org's tag (e.g. "[SHU]") on Discord or in chat so players can find you if they have the invite code.
- Wings are inherited from your in-game org assignment — the overlay reflects your current game rank.
- Invite codes are not expiring links; they're permanent org-level keys. Rotate them only if you want to stop recruiting.
- If a commander disbands the org, all members lose their membership instantly — there is no grace period.
⊞ ORG OPS
Real-time org member tracking and broadcast messaging for leadership coordination.
What it does
ORG OPS is a command center for org officers and above. The left panel shows your online members (green dot = online, gray = offline) with their current ship and zone if in-game. The right panel (officers+ only) lets you broadcast messages to the entire org — marked as INFO, MISSION (strike orders), or ALERT (urgent). Members see incoming broadcasts as a banner when they open any overlay page. Updates refresh every 30 seconds.
How to use it
- Check who's online: The left column lists all org members, online ones at the top. Green dot = in-game now. Tap a pilot's row to pin them at the top.
- See their status: If online, you see their current ship and location (zone). Offline pilots show gray.
- Broadcast a message (officers+): In the right panel, select a message type: INFO (general), MISSION (strike orders, amber accent), or ALERT (urgent, magenta). Type your message (max 300 chars).
- Send: Tap "▶ BROADCAST". The message appears as a banner to all members the next time they load an overlay page (or refresh Ops).
- Clear broadcasts: Tap "✕ CLEAR" to remove the current broadcast; members see a cleared state on their next refresh.
- View incoming: Any broadcast sent to your org appears as a header banner with sender, type, and age (e.g. "5m ago").
Key features
- Live roster — online/offline status with real-time ship and zone for each pilot
- Broadcast types — INFO (cyan), MISSION (amber/strike), ALERT (magenta/urgent) with color-coded banners
- Officer-only compose — members see the board but can't send; non-officers see roster but no broadcast panel
- Auto-refresh every 30 seconds — no manual poll needed; members stay in sync
- Banner persistence — broadcast stays visible until cleared; replaces any previous one
- No time zone friction — age shown in minutes/hours relative to now
Tips
- Broadcasts push to members on the NEXT refresh or page load — there's no instant notification in-game. Tell people to check Ops if it's urgent.
- Use ALERT for imminent threats or rally commands (e.g. "Pirate alert at Grimhex"). Use MISSION for planned ops.
- The roster syncs with your in-game pilot status (ship/zone from Game.log). If you're not in-game, that data won't appear.
- Members always see the broadcast at the top of the page until it's cleared, even if they switch between overlays.
⚔ STRIKE GROUPS
Post and join tactical operations with role slots, Discord voice, and mission briefings.
What it does
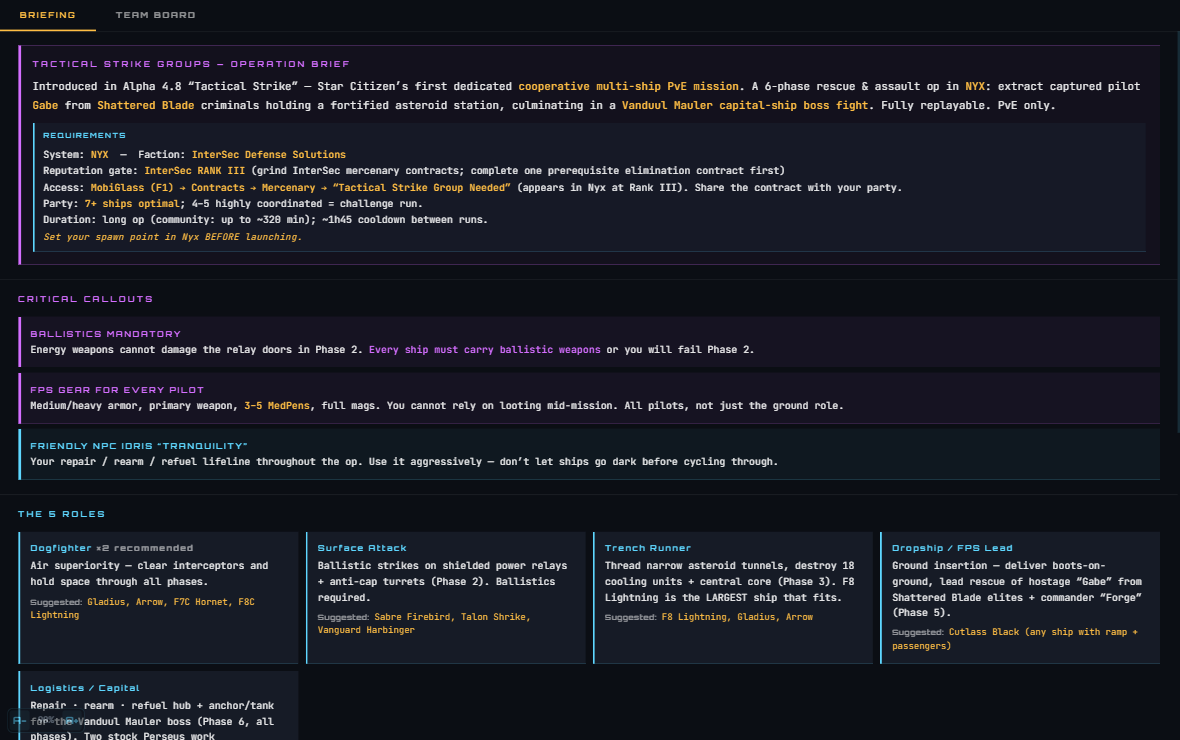
STRIKE GROUPS is H.U.D Manager's matchmaking system for Tactical Strike Group missions (TSG, introduced in Alpha 4.8). Two tabs: BRIEFING shows the full mission intel (6 phases, 5 roles, rewards, critical callouts), and TEAM BOARD lists active strike groups looking for pilots. Claim an open role slot with your ship choice, get voice channel invites from group leaders, and launch together.
How to use it
- Read the briefing: Click the BRIEFING tab. Learn the 6 phases: Defend Tranquility → Destroy Relays → Trench Run → Bring Down Core → FPS/Rescue → Hold the Line + Vanduul Mauler boss. Note the 5 roles (Dogfighter, Surface Attack, Trench Runner, Dropship/FPS, Logistics/Capital) and recommended ships.
- Check critical callouts: The briefing lists ballistics-only doors in Phase 2, FPS gear requirements (armor, meds), and the friendly Idris support ship. Read these before launching.
- Switch to TEAM BOARD: Filter by "ALL OPS" or "OPEN ONLY" (ops still recruiting). Scroll through posted strike groups.
- Click a row to expand: See the group's title, system, leader, member count filled/total, Discord invite, notes, and role slots.
- Claim a slot: If you're not in the group yet, tap a role's "CLAIM" button, type your ship name (optional but helpful), and you're in. You now see a "RELEASE" button if you change your mind.
- Join Discord: If the leader posted a voice link, tap "JOIN COMMS" to jump into their Discord channel.
- Post your own op: Tap "+ POST OP" at the top, set a title (e.g. "Nyx Gate Rescue Alpha"), select system (Stanton/Nyx/Pyro), paste a Discord voice invite, add optional notes, and tap "POST".
- Manage your op (leader only): You see "CLOSE OP" (stop recruiting) and "DELETE" buttons on your own posted ops.
Key features
- Full mission briefing — requirements, phase breakdown, 5 role descriptions, rewards (blueprints, reputation, aUEC)
- Live role slots — 7 slots per op (2 Dogfighters, 1 Attack, 1 Trench, 1 Dropship, 2 Logistics recommended)
- Ship claims — pilots can note what ship they're bringing for each role
- Discord integration — leaders paste voice invite; members see "JOIN COMMS" button
- Looking For Group (LFG) — section at the bottom for solo pilots offering to join any op
- 30-second auto-refresh — board updates in real time
- Op statuses — OPEN (recruiting), FULL (all slots claimed), CLOSED (leader stopped recruiting)
- Expansion details — click a row to see leader name, org tag, creation time, and full notes
Tips
- Ballistics weapons are MANDATORY — energy weapons cannot open Phase 2 relay doors. Every ship must carry ballistics.
- FPS gear (medium/heavy armor, primary, 3–5 med pens) is required for ALL pilots, not just ground team. Loot won't save you mid-mission.
- Trench Runner role is tight — F8 Lightning is the largest ship that fits. Arrow and Gladius are guaranteed safe.
- The friendly Idris "Tranquility" is your lifeline for repair/rearm/refuel. Use it aggressively between phases.
- If a leader's op is full, you can post your own or wait for someone to release a slot. The board refreshes every 30 seconds.
- The mission takes 1–2 hours; plan accordingly and set your spawn point in Nyx before launching.
▶ MEDIA
Curated video player for Star Citizen tutorials, music, gameplay, guides, news, and creator feeds — all without alt-tabbing.
What it does
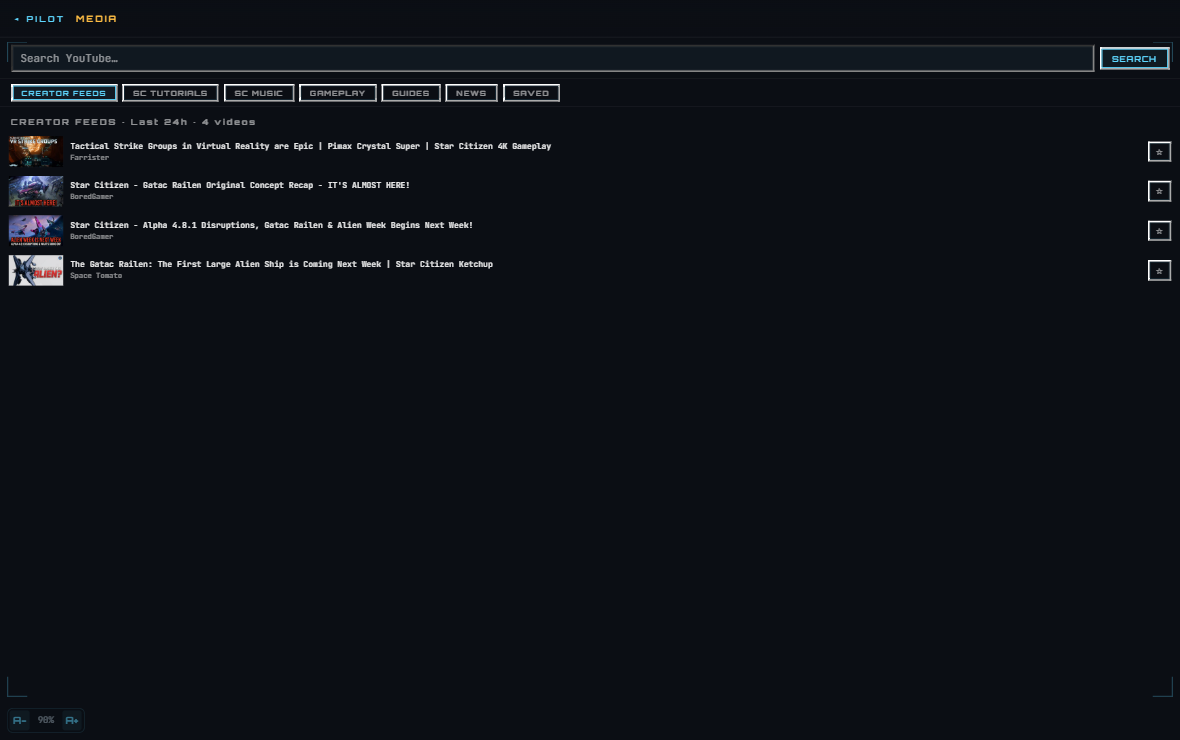
MEDIA is a video browser built into your overlay. It pulls curated Star Citizen videos (tutorials, music, guides, news) from YouTube, lets you search for any video, and saves your favorites to localStorage. Videos play in an embedded iframe at the top; scroll the list below to find more. Categories: Tutorials, Music, Gameplay, Guides, News, Creator Feeds (last 24h), and Saved. No alt-tabbing needed.
How to use it
- Pick a category: Tap one of the chips (CREATOR FEEDS, SC TUTORIALS, SC MUSIC, GAMEPLAY, GUIDES, NEWS, SAVED). Curated videos appear below in a list.
- Search YouTube: Type in the search bar at the top (e.g. "mining guide 4.8") and tap SEARCH. Results appear in the list (if YouTube API is configured).
- Play a video: Click any video row. The player loads it and you see the title at the top.
- Save a video: Tap the ☆ button on any row. It turns amber and the video is saved to the SAVED category (up to 50 videos). Tap ★ to unsave.
- Fullscreen: In the player info bar, tap "⤢ EXPAND" to expand the player to nearly fullscreen. Tap "⤡ SHRINK" in the corner to collapse.
- Close player: Tap the ✕ CLOSE button in the player info bar to collapse the player and show just video list.
- Creator feeds: Tap CREATOR FEEDS to see videos from curated SC content creators in the last 24 hours (requires the API endpoint `/api/sc-creator-feeds`).
Key features
- Embedded YouTube player — no opening new tabs; play in-overlay with autoplay
- Curated categories — Tutorials, Music, Gameplay, Guides, News (pre-populated; search adds more)
- Creator feeds — auto-fetch last 24h uploads from known SC creators (requires server-side config)
- Full-text search — search YouTube directly if API key is set in Cloudflare Pages env vars
- Save to favorites — 50-video limit; persists in localStorage
- Expand/collapse player — fullscreen mode for focused viewing or minimize to browse more videos
- Video metadata — thumbnail, title, channel, save button all visible at a glance
- Context menu — right-click any video row for "PLAY HERE" or "OPEN IN NEW WINDOW" (Electron only)
Tips
- Creator feeds require the `/api/sc-creator-feeds` endpoint and a curated list of YouTube channel IDs on the server side.
- Search requires `YOUTUBE_API_KEY` set in Cloudflare Pages environment variables (free tier has quota limits).
- The player uses YouTube's embedded iframe — ad-free if you have YouTube Premium, otherwise standard ads.
- Saved videos are stored in your browser's localStorage (50-video max). They sync to your pilot account if you sign in.
- LIVE badge automatically strips from titles; video is still playable even if recorded from a past stream.
- Curated lists are hand-updated — if a channel is dead or removed, admins delete it from the config.
🎬 HUD STUDIO
Live desktop recording, streaming setup, and mic meter for content creators using the Electron overlay.
What it does
HUD STUDIO (accessed via the CAPTURE screen in the overlay's Electron app) is a creator toolkit for recording and streaming Star Citizen gameplay. It displays a live canvas preview of your game, offers one-click record/stream buttons, and includes a real-time microphone level meter with a 0–200% gain slider (drives actual ffmpeg recording volume). Built for streamers and video makers who need quick access to audio monitoring without tabbing out or opening OBS.
How to use it
- Open CAPTURE: In the overlay pill bar, tap the screenshot/record icon, or navigate to the CAPTURE screen (marked as "Media Viewer" / "MEDIA" in the main interface).
- See canvas preview: A real-time game capture displays at the top. This is what your recording/stream will see.
- Check mic levels: A vertical meter on the right shows your microphone audio level (0–255 scale). Green = normal, amber = loud, magenta = clipping.
- Adjust gain: Below the meter, drag the "MIC GAIN" slider from 0% to 200%. This scales your mic input for ffmpeg (1x = 100%, 2x = 200% boost). Watch the meter move as you slide.
- Start recording: Tap the RED RECORD button. ffmpeg starts capturing the canvas at your chosen resolution + fps. Stop with the same button (turns blue RECORDING).
- Start streaming: If configured, tap STREAM and choose your destination (RTMP endpoint). The meter and gain still work during stream.
Key features
- Live canvas preview — see exactly what you're recording or streaming, letterboxed/scaled to fit
- Real-time mic meter — watch your audio level as you speak; prevents clipping surprises
- 0–200% gain slider — boost or cut mic volume for ffmpeg without touching Windows mixer
- One-click record/stream — no config needed on first launch; toggles on/off instantly
- ffmpeg backend — professional-grade codec choice (H.264, VP9, Opus audio)
- Settings persist — gain slider value saved to Electron's localStorage between sessions
- Responsive layout — scales to your overlay window size
Tips
- HUD STUDIO is Electron-only — web browser version does not have this feature (uses `/api/overlay-apps` instead).
- The mic meter reads RAW input before ffmpeg gain is applied. Your final recording volume = raw level × gain slider.
- Canvas resolution scales to your screen's logical pixel density. Very high DPI or multi-monitor setups may need preview shrink to avoid laggy capture.
- Recording output folder is set in the Electron app settings — check "Output" in the SETTINGS page before recording.
- If the meter spikes into magenta (clipping), reduce your source mic volume in Windows, then use the gain slider if needed for balance.
- Stream endpoints (RTMP server URL, API key) are set in Settings → STREAMING before you can stream. Recording needs no setup.
- App must restart if you swap audio devices — the device list is cached on launch.
💬 COMMS
In-game text and voice chat with org mates and custom squads via WebRTC peer-to-peer voice.
What it does
COMMS is a built-in radio for your org. Four tabs: GENERAL (public channel), LFG (looking-for-group recruitment), ORG (your org channel, if you're a member), and GROUPS (custom voice squads you create or join). Text is instant; voice uses WebRTC peer-to-peer (P2P) connections with STUN/TURN relay fallback. Speaking status shows live as colored borders and an animated mic icon next to each pilot's name when their voice is active.
How to use it
- Sign in: If not already signed in, tap the SIGN IN link in the login gate to authenticate via your pilot account.
- Pick a channel: Tabs at top: GENERAL (default), LFG, ORG (if you're in an org), GROUPS (custom squads).
- Send text: Type a message at the bottom (max 280 chars) and tap the ➤ send button. Your name appears in amber; others in cyan/rainbow.
- Join voice: Tap "JOIN VOICE" in the voice bar. You'll be asked for microphone permission. Once allowed, your status changes to "LEAVE VOICE".
- See who's speaking: Pilots with active mics show a colored border + animated mic pulse in the voice bar. Your own name shows an amber accent.
- Push-to-talk (PTT) mode: Default. Hold SPACE (or click/hold the PTT button) to transmit. Release to mute. Indicator button shows ACTIVE state.
- Switch to Hands-Free (VOX): Tap ⚙ settings, select "HANDS FREE" mode. Mic is always on when you're in voice; speaking detection is automatic.
- Adjust volumes: In voice settings, use sliders for mic gain (0–200%) and output volume (0–100%). See instant meter feedback.
- Create a squad (GROUPS tab): Tap the + button, give it a name and optional password. Share the code with squad mates. They can join with "JOIN GROUP" + code.
- Switch between text & voice: You can chat and voice in the same channel. Voice connections are per-channel/group.
Key features
- 4-channel system — GENERAL (public), LFG (recruitment), ORG (org members only), GROUPS (custom squads)
- Text messaging — 280 char limit, timestamps, pilot names color-coded by hash (6 colors + amber for self)
- WebRTC peer-to-peer voice — direct connections between pilots with STUN/TURN relay if needed
- Speaking detection — RMS audio analysis shows animated mic pulse + highlight border when pilot is talking
- Two voice modes — Push-to-Talk (SPACE or button hold) or Hands-Free (always-on, auto-detect talking)
- Device selection — choose from connected mics and speakers in settings; changes persist
- Gain controls — mic boost 0–200%, output volume 0–100%, all adjustable live
- Squad groups — create custom voice channels with optional password; 6-character codes
- 30-second message poll — messages and presence sync every 30s (or 3s when voice active for lower latency)
- LFG looking-for-group — post your role + ship + Discord tag; others see you recruiting
Tips
- WebRTC needs a peer to establish voice — if you're alone in a channel, your voice won't route anywhere until someone else joins.
- STUN (public relay) works in most cases. TURN relay credentials are fetched per-session from `/api/turn-creds` (Cloudflare Realtime required).
- Speaking detection uses a threshold of ~8 RMS; very quiet mics may not register as "speaking". Increase mic gain if your voice isn't detected.
- The ORG channel only appears if you're a member of an org (detected from localStorage `hud_pilot_org`). Non-members see just GENERAL, LFG, GROUPS.
- Squad codes are 6 characters (e.g. "AB3X7K"). Codes are permanent — share them carefully. Only leaders can disband a squad.
- Text message history persists only in the current session. Close COMMS and reopen = blank slate (unless you enable localStorage archiving server-side).
- Hands-Free mode is always-on — if you need privacy, switch back to PTT or mute your mic at the OS level.
- If voice peers fail to connect, check that your firewall allows outbound UDP (WebRTC uses UDP). Some ISPs block peer connections — TURN relay helps but may not guarantee success.
Need a hand? Visit Support or send feedback from inside the app (TOOLS → Send Feedback). H.U.D Manager is an unofficial fan tool, not affiliated with Cloud Imperium Games or Roberts Space Industries.